Tutorial - Your Programs Area
Your programs area is very similar to your plans area, with a few differences. Here, you'll be able to create programs from scratch, save them from the library, send them to others with ease, and delete unwanted ones to save space. We believe this is a fantastic addition to the array of Fitain functionalities, and we think you'll be pleased with the results. As this is a vast area, we have broken it down into the following sections:
- What are Programs?
- Programs Area
- Program Builder
- Editing Programs
- Sending Programs
- Completing Programs
1 What are Programs?
A program is a collection of plans for you to schedule and organise. You have full flexibility in how you construct these days and weeks, which we’ll go through in this tutorial. The way we’ve designed programs allows you to:
- Go at your own pace and pick up where you left off.
- Freely make edits while completing (more on this later).
- Easily share with your connections.
- Construct the program in any way by editing certain elements (more on this later).
- Publish public programs to make them searchable and shareable for everyone (pros only).
- Create private programs for personal use.
We've built this to be as simple as possible, and some elements will resemble the plan builder, so it should feel familiar. Let’s move on.
2 Programs Area
As mentioned before, this follows a similar architecture to the plans area, so it should be familiar. You'll be greeted with familiar tabs, which we'll discuss in this section. Let's take a look at:
- 2a - Getting to the programs area.
- 2b - Tabs.
2a - Getting to the programs area.
First, let's take a look at how we get here. Essentially, you have two ways.

To get to the programs area, follow these steps:
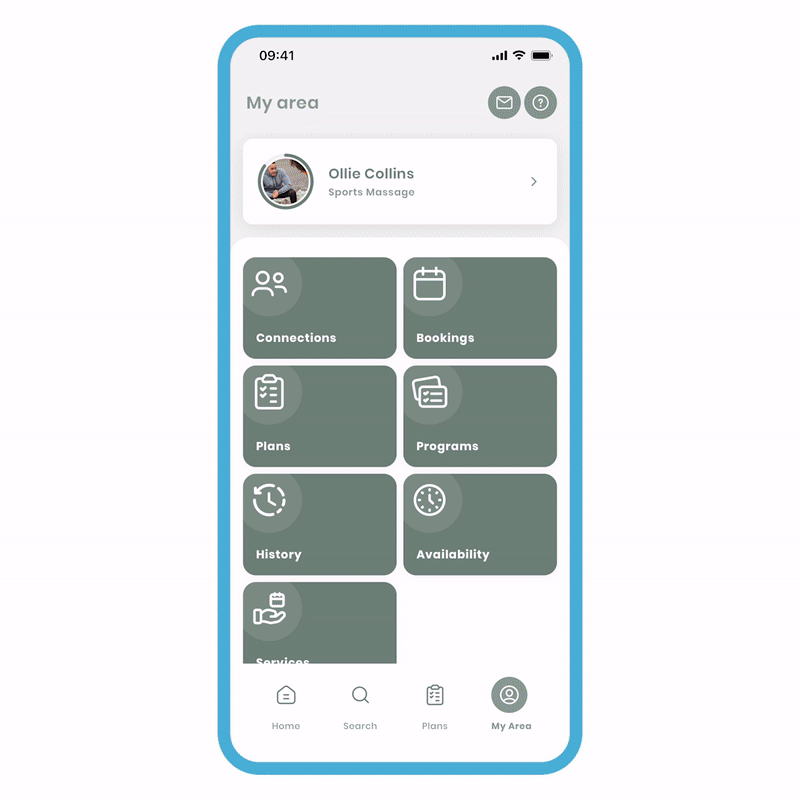
- Go to your area and select the 'Programs' tile.

Or for quick access:
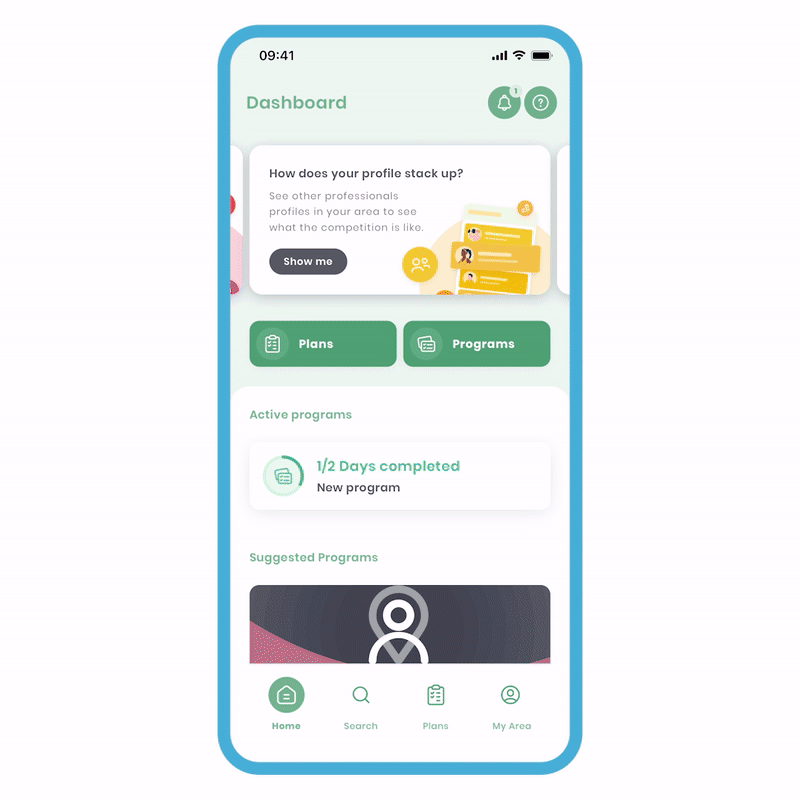
- Look on your dashboard and select the 'Programs' shortcut.
In both scenarios, you'll be brought to the Programs Area screen. Let's take a look at what's possible in the next section.
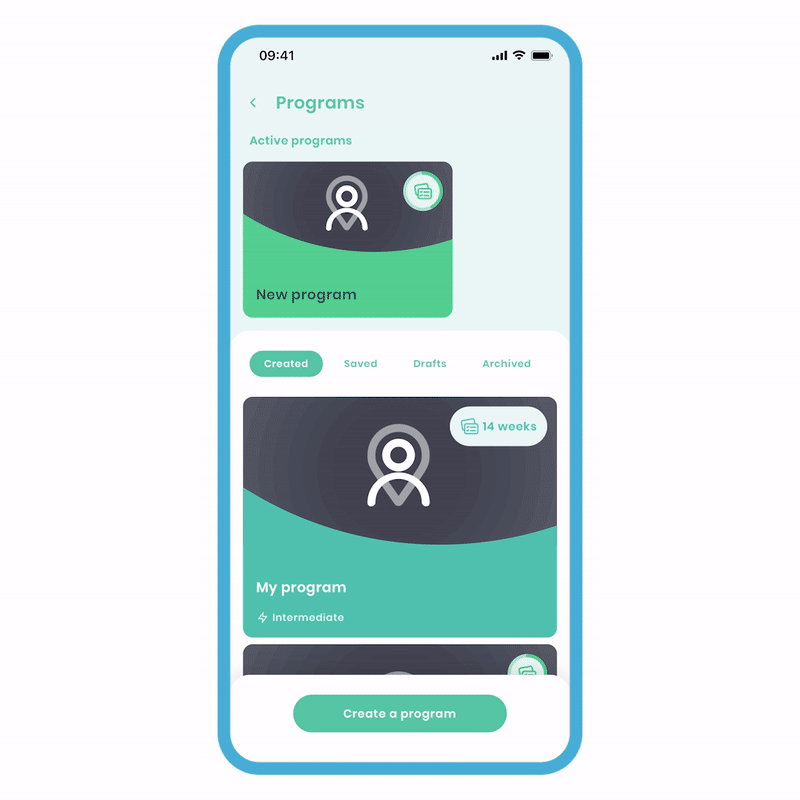
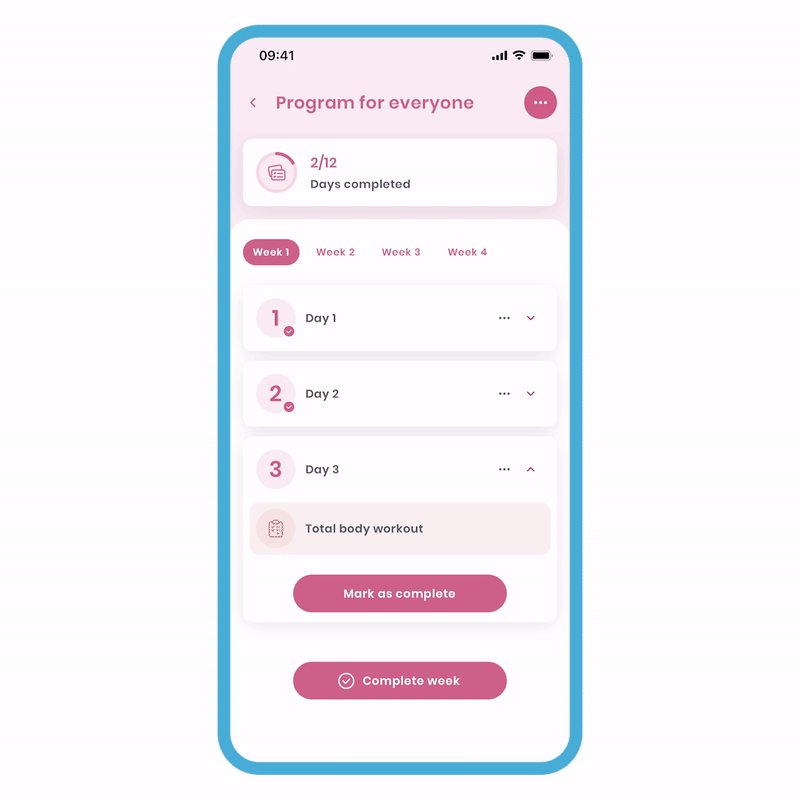
2b - Tabs.
Like in the plans area, we use the same tab system, which helps organise your items. Once you click on a tab, the main action changes. Let's take a look.
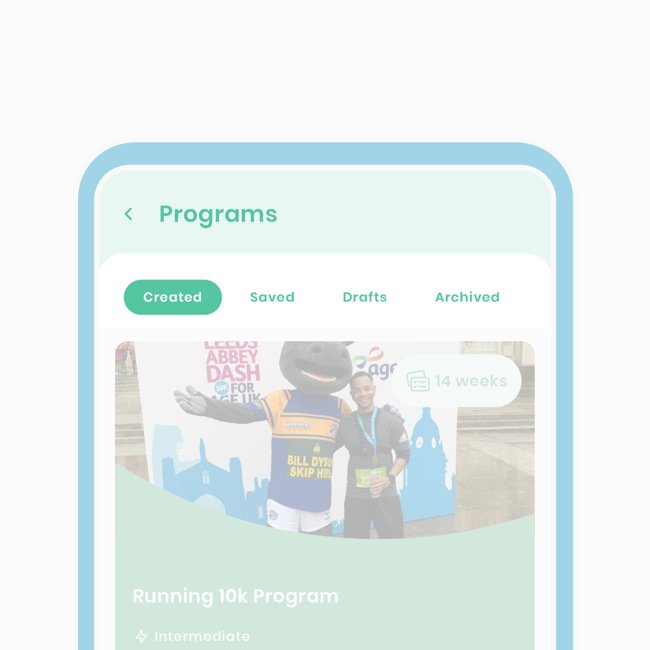
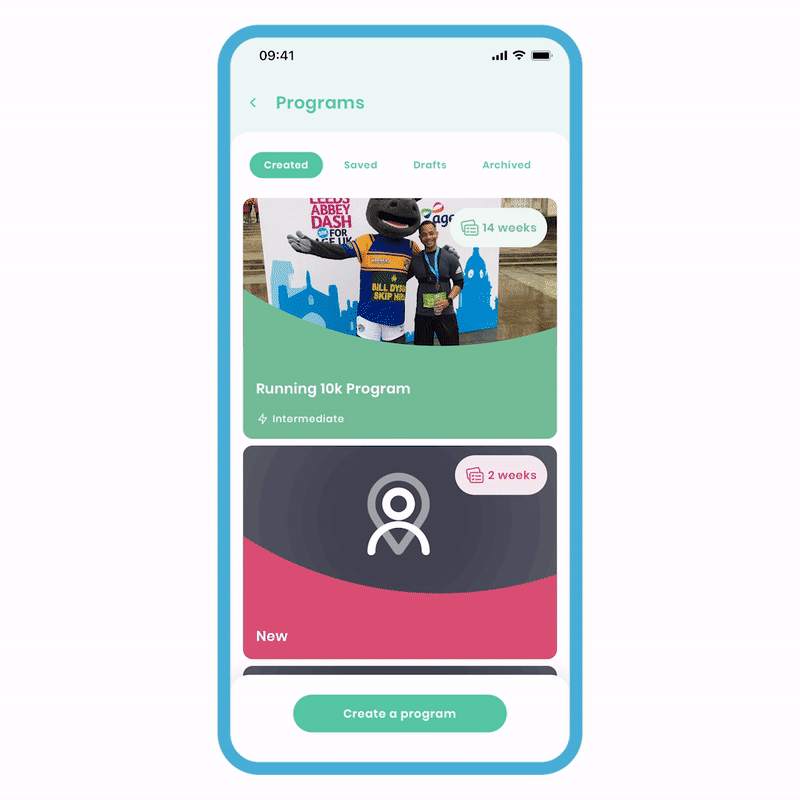
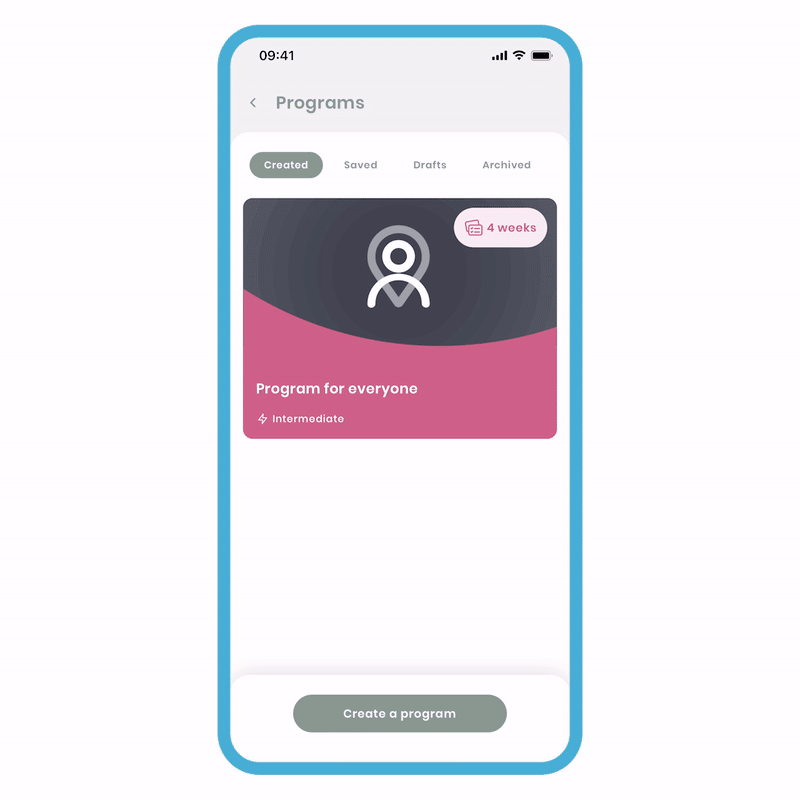
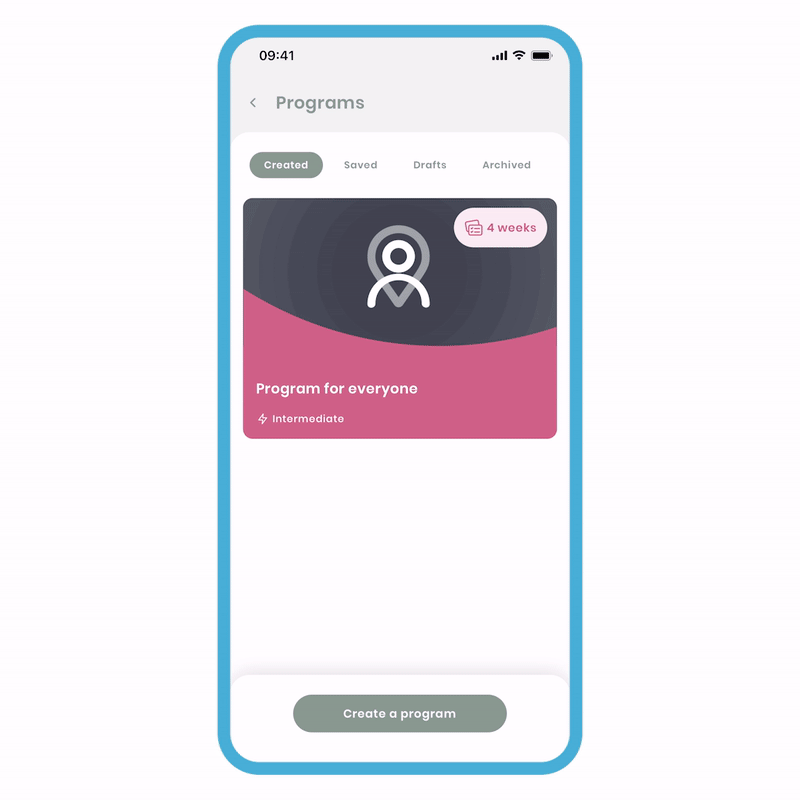
Created Tab
This list stores all your created programs. You are the owner of everything in this list, including private, public, and published (if Pro) programs.
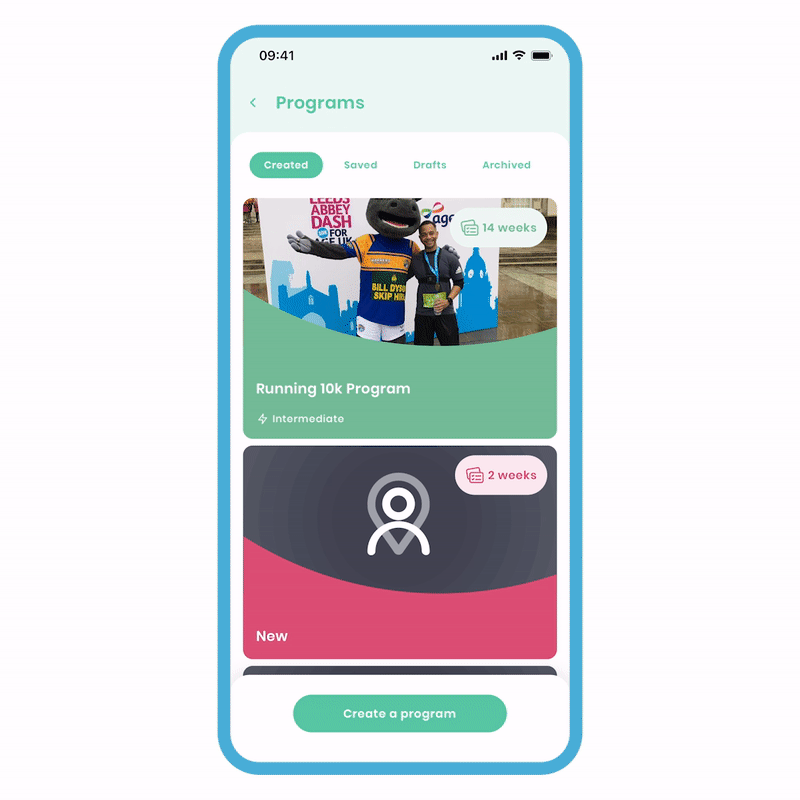
You'll see the main action here is to 'Create a program.' We will further explore the creation process in section 3, later in this tutorial.
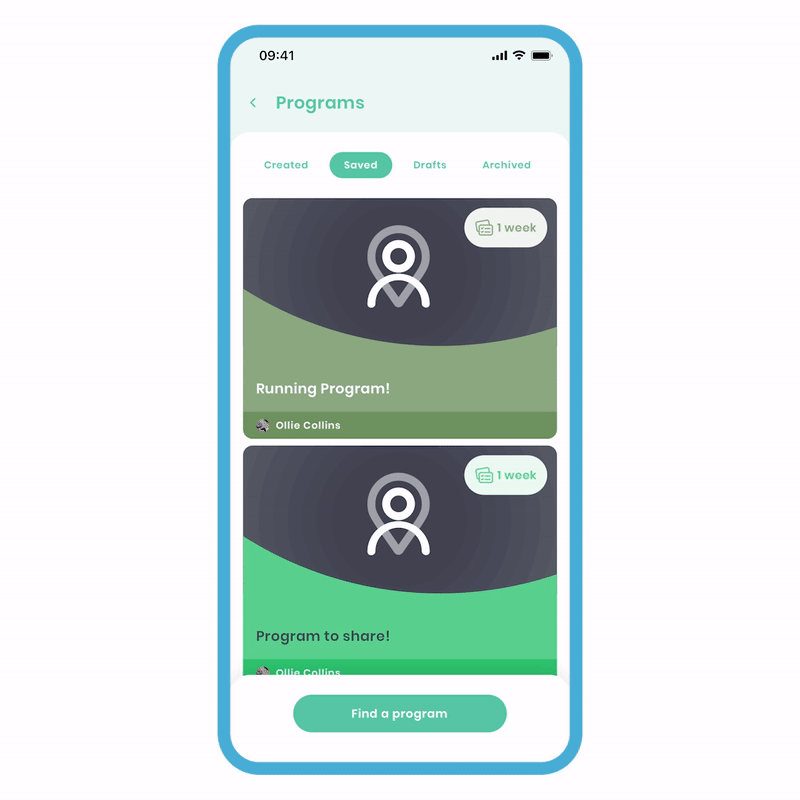
Saved Tab
This list shows all the programs you’ve saved from the library or that have been sent from a connection. It's best to think, 'I’ve saved this to my area.'

You'll see the main action here is to 'Find a Program,' which will launch the main search. If you can't find a program, it's best to create your own. The library will expand over time.
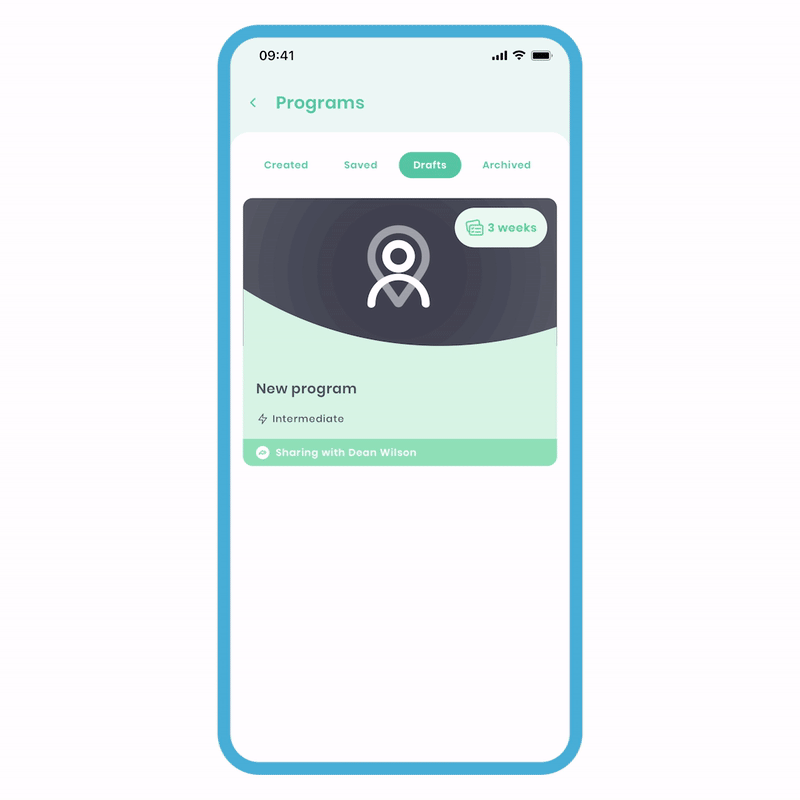
Drafts Tab
This list is where you’ve selected the 'send and edit' option when you’re about to send a program. This creates a 'draft,' and the recipient’s name will be at the bottom. You may want to do this if you want to use a master program as a template, create the draft, and make changes without affecting the master.
There is no main action for this tab. The program will not be sent to the recipient until you select the program and choose 'send to [connection’s name]'.
Archived Tab
This list consists of all the programs you’ve archived. You'll notice that the tiles are faded slightly, indicating this. The items will remain in this list for a certain amount of time and are recoverable.
To restore a program:
- Select the program you want to restore.
- Click 'more options' (three dots) at the top right and choose the 'restore' option.
The program will now return to its original list of Created, Saved, or Drafts. As you can see, the process is identical for programs and plans.
3 Program Builder
This section will cover the main part of the tutorial, the creation process. We give you the opportunity to create/do whatever you want in the context of plans. Now, the next step is to schedule these plans into programs to help you stay accountable and on track. We think we’ve created a really sharp, easy, and simple way to do this. If you’re familiar with the plan-building process, this should come second nature to you. If not, don’t worry, we've got you covered. There are some new concepts to learn, but it’s super simple. As this is a big section, we’ll break it down as follows:
- 3a - Creating the main structure.
- 3b - Adding items to the day.
- 3c - More.
3a - Creating the main structure
Creating a program starts with a simple process that Fitain helps guide you through.
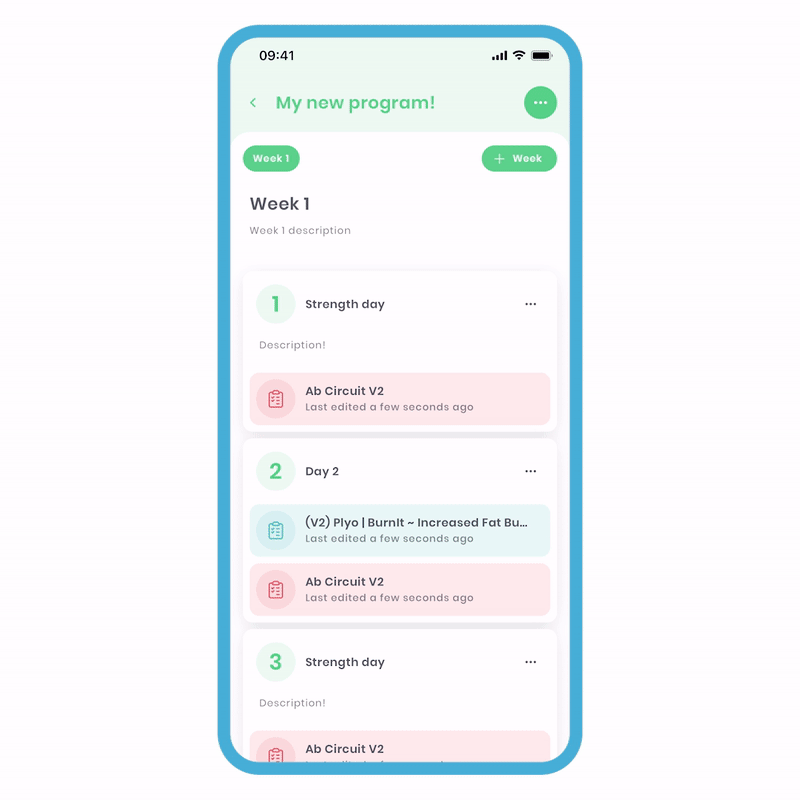
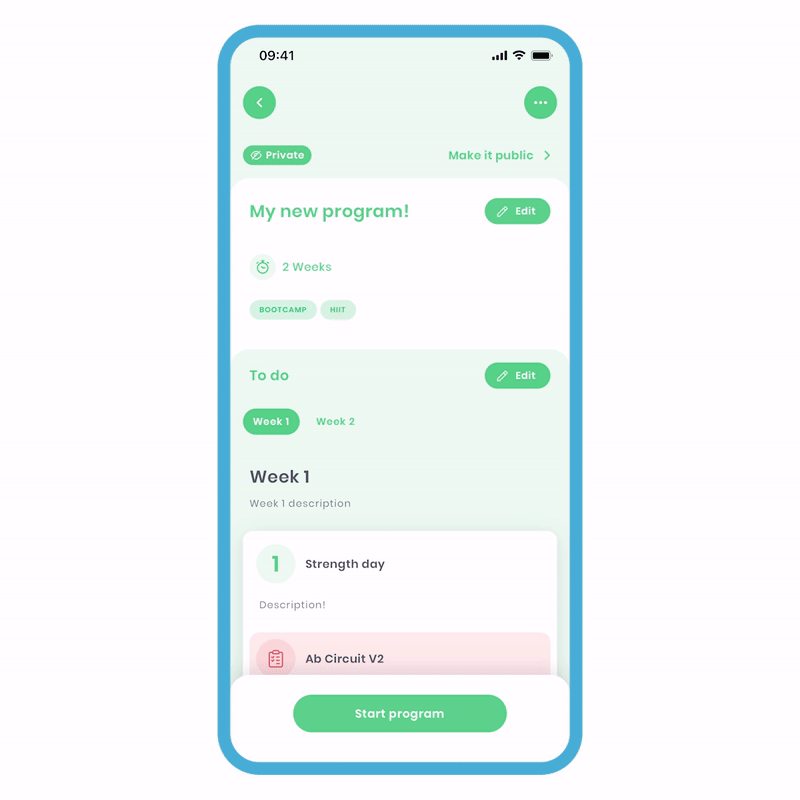
Creating a New Program
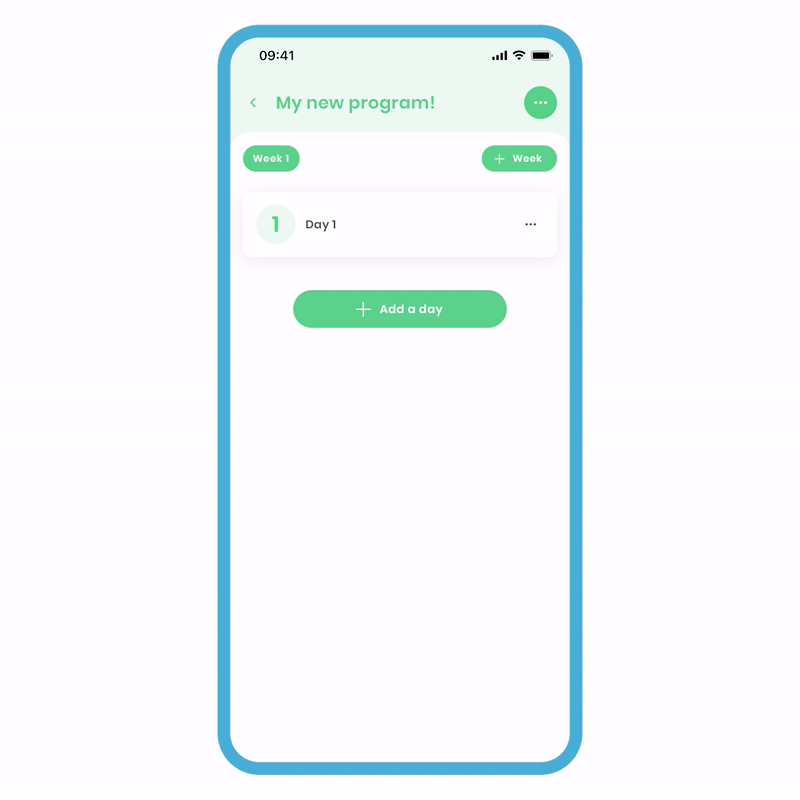
Each program must have at least one week and at least one day. Adding a week is mandatory, and you won't be able to create a program without it. To begin, we need to navigate to the create tab and select the main 'create a program' action.
To do this:
- In your programs area, select 'Create a Program.'
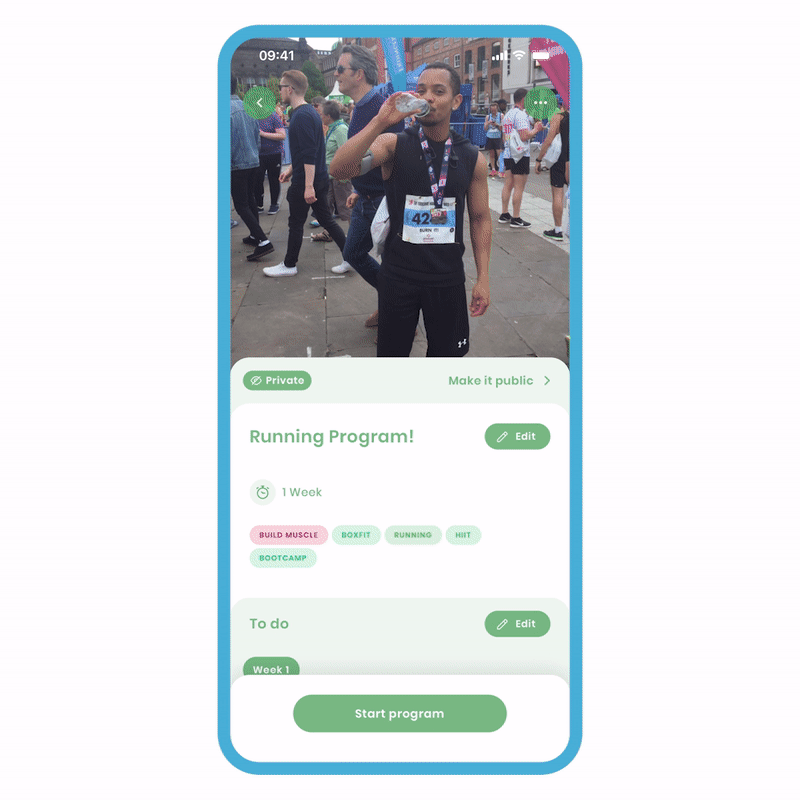
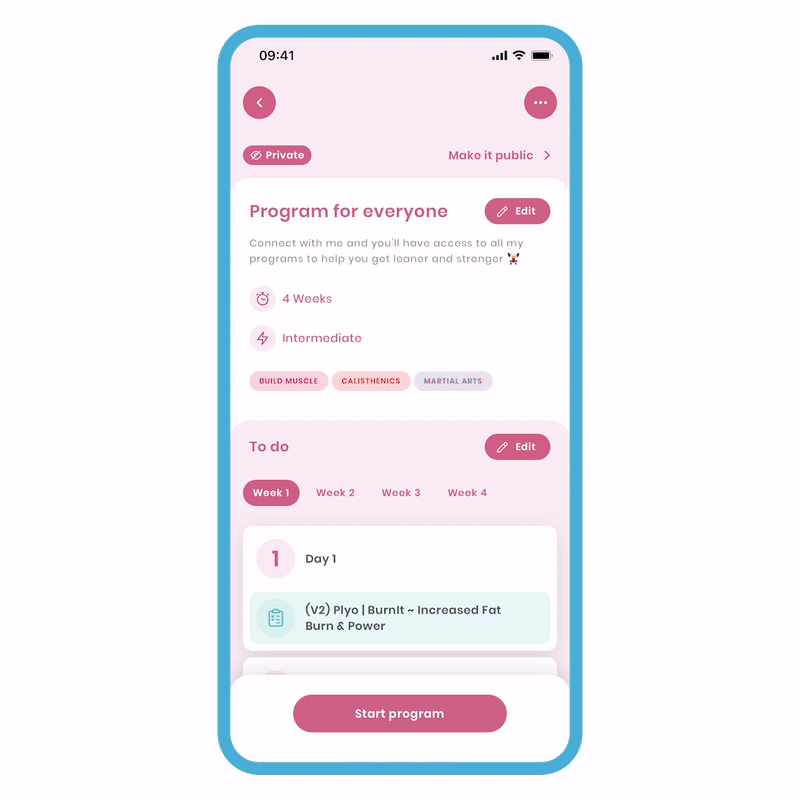
- You’ll be brought to the 'New Program' screen. Fill out the mandatory title and tags fields to continue. Optionally, you can add a duty-free picture, description, and difficulty. Click 'Next,' and you'll be brought to the 'Add Week' screen.
- Select how many days you want to generate and click 'Save.' Now your program has been created.
If you notice, you have full control over how many days you want to generate in the week. Additionally, the days are numbered and not named, and it's not strict. From our testing, we found that we had a better experience and more flexibility doing it this way. You can create titles, which we’ll explore further along the tutorial and explain why you may want to do this.
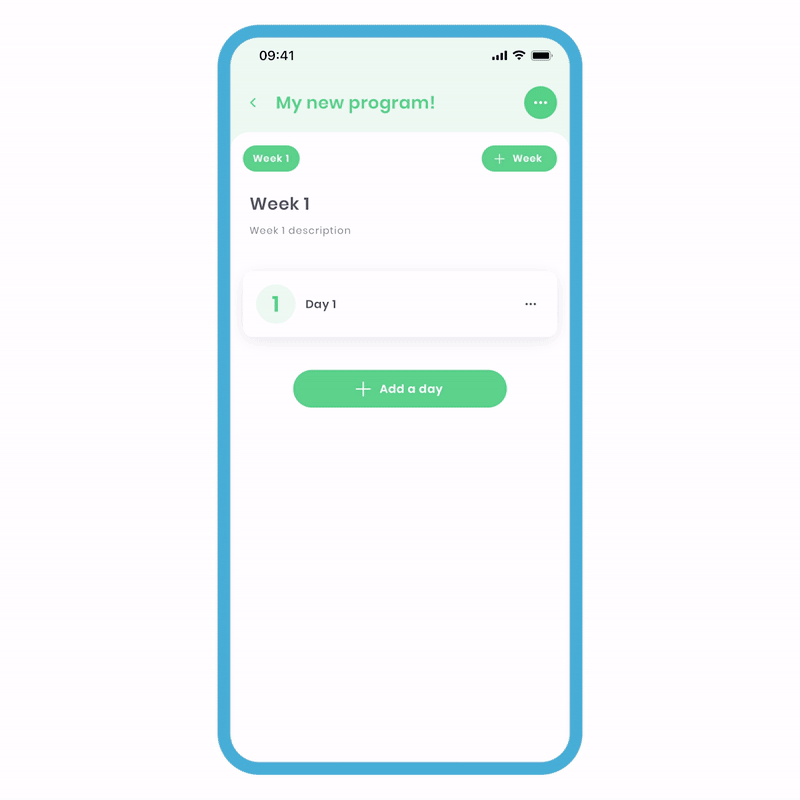
Adding Week Details
Adding a title and description is always optional when coming to the 'Add Week' screen. For example, you may want to call this 'Beginner week' or 'De-load Week' where all the plans within the days reflect this. If you've created the week and didn't want to add these details at the time, you can easily make the edit.
To do this:
- On the main Programs Editing screen, click 'More Options' (three dots) and select 'edit week details.'
- On the 'Edit Week Details' screen, type in the title of your day and add a description if desired.
We never restrict you from limiting your creativity.
Pen & Paper in 2023?
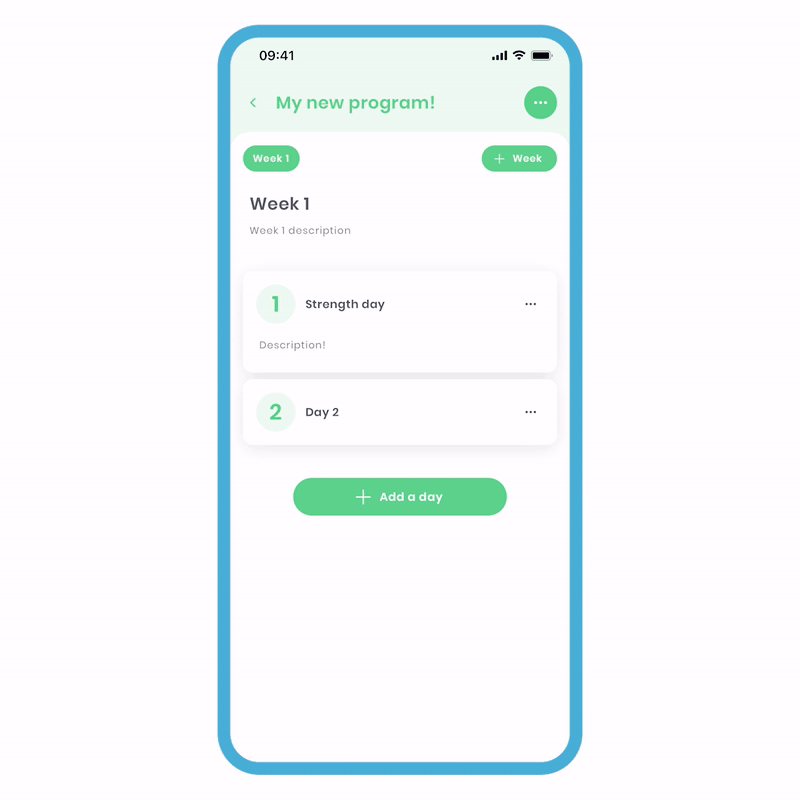
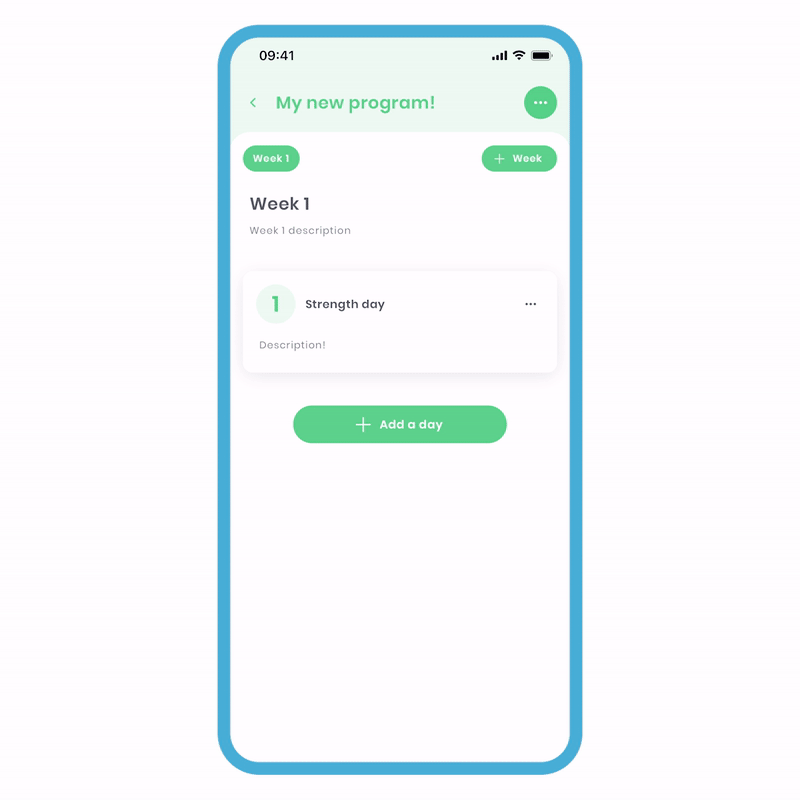
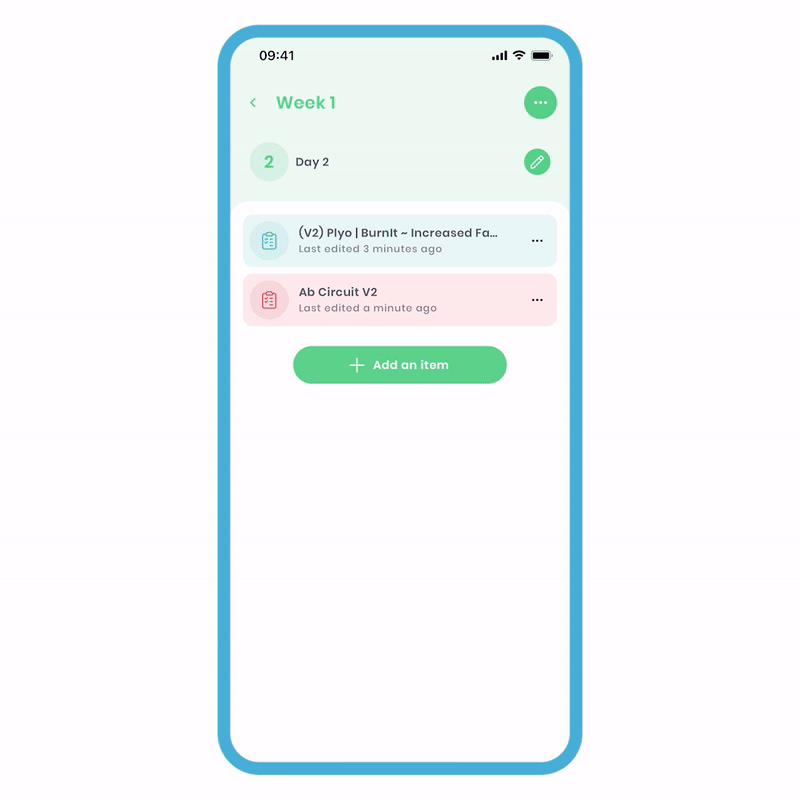
Creating a New Day
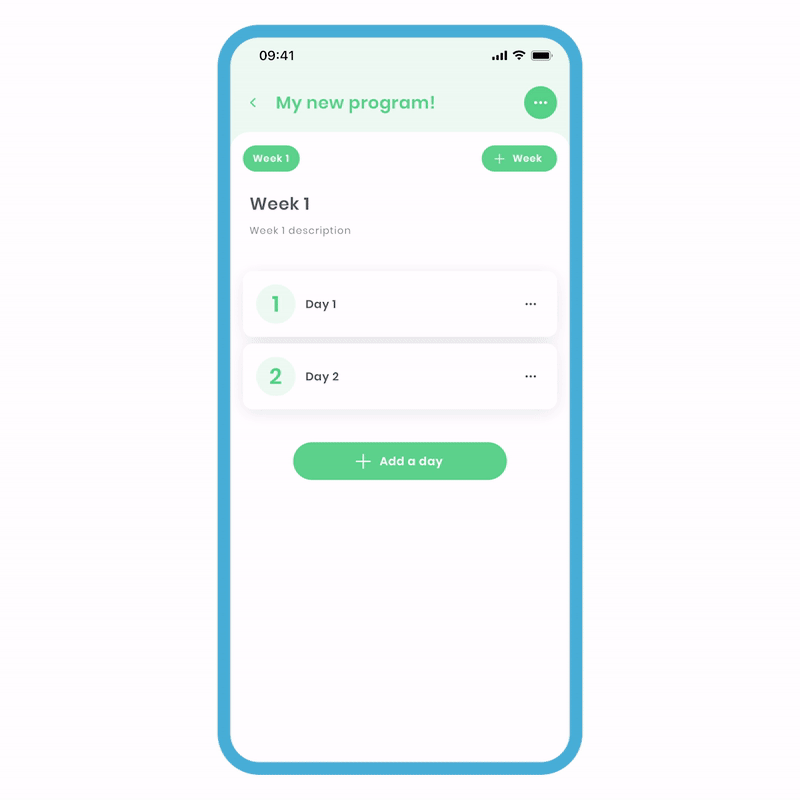
As mentioned before, you can add up to 7 days in the week; however, you are not restricted if you don’t want to. You may find this useful if you prefer a more relaxed, free-flowing, and flexible way of completing a week. For example, your main sessions could be 3 times a week, and you can take time between each day. As long as you complete these days within the week, this is perfectly valid and gives you control over your journey.
Alternatively, you may want a stricter schedule that includes specific rest days if that way works for you. It really is up to you and how you construct it - that’s the power of what we have built.
To add a day:
- On the main 'Program Edit' screen, click the 'Add a day' button, which will appear under the last day added.
- On the popup, select 'Add new day,' and you’ll be brought within the day. Now, you can freely customise the day items as you want (more on this later).
You may notice on the day tiles, the number is sequential depending on where it is on the list. Here are some things to note:
- If you delete a day further up the list, the day numbers will change based on the new order of the list.
- If you delete the last day of the list, the numbers will not change.
- If you have already added 7 days, the 'Add new day' button will disappear.
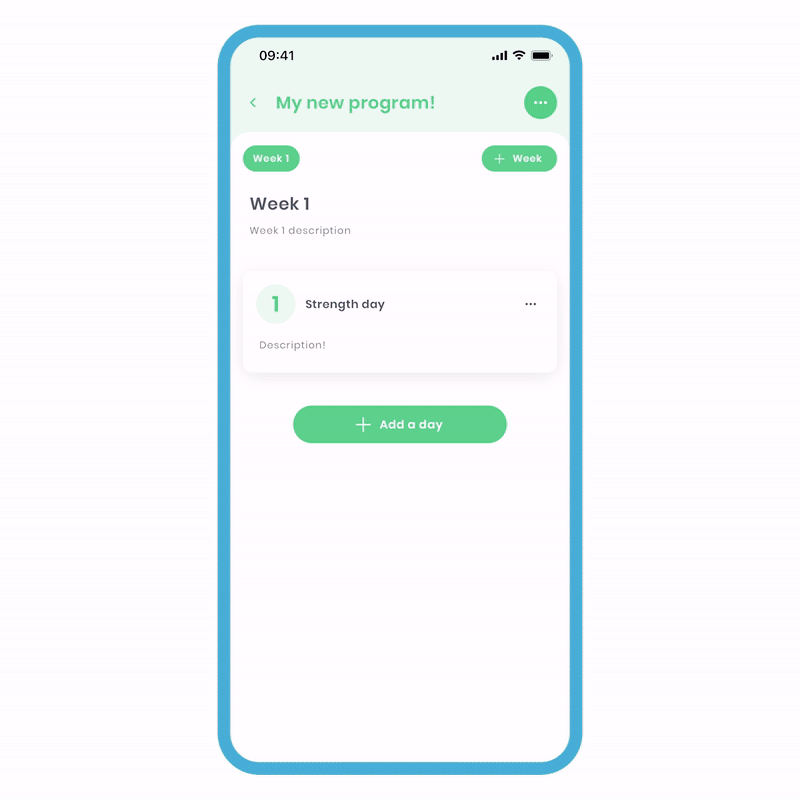
Editing the Details of a Day
For each day you add, you can edit the details. By default, they’ll be labeled ‘Day 1, 2, etc…’. Like before, you can edit the description and title of the day if that’s the way you want to do it. For this example, let’s call this ‘Chest & Back Day’.
To do this:
- Select the day you want to edit the details of. You should be in the day itself.
- Press the 'edit details' button (pen icon) next to the day name. This will bring you to the 'Edit day' screen.
- Edit the day details as you see fit.
You may want to type in 'Day 1 - Leg Day' and add a description. Feel free to put in literal days of the week if that’s the way you want to construct your program. For example, 'Day 1' could be named 'Monday'.
Deleting the Day
On the main editing screen, you’ll notice three dots on the top right of each day tile. These are additional options you can select regarding the day itself.
To delete the day:
- On the main Program Edit screen, select 'more options' (three dots on the day tile). You should see an array of options.
- Select the 'Delete' option, and you’ll be greeted with a popup to confirm your decision. Click 'Delete,' and your day item will be deleted.
Please note, if you have only 1 day added to a week (Week 1, Day 1), you cannot delete this as it is mandatory. But if you add another day and then delete the original Day 1, this will change the order, resulting in a new 'Day 1'. However, you can clear the day.
Clearing the Day
Clearing the day only removes all the items within the day, allowing you to start again. If there are no items saved to the day, this option will not be shown.
To clear the day:
- On the main Program Edit screen, select 'more options' (three dots on the day tile). You should see an array of options.
- Select the 'Clear' option, and you’ll be greeted with a popup to confirm your decision. Click 'Clear,' and your day item(s) will be deleted.
You may notice a few similarities with the program builder and plan builder regarding construction. The program 'days' resemble a similar structure as plan groups. Once you get the hang of this, you'll be creating programs in no time.
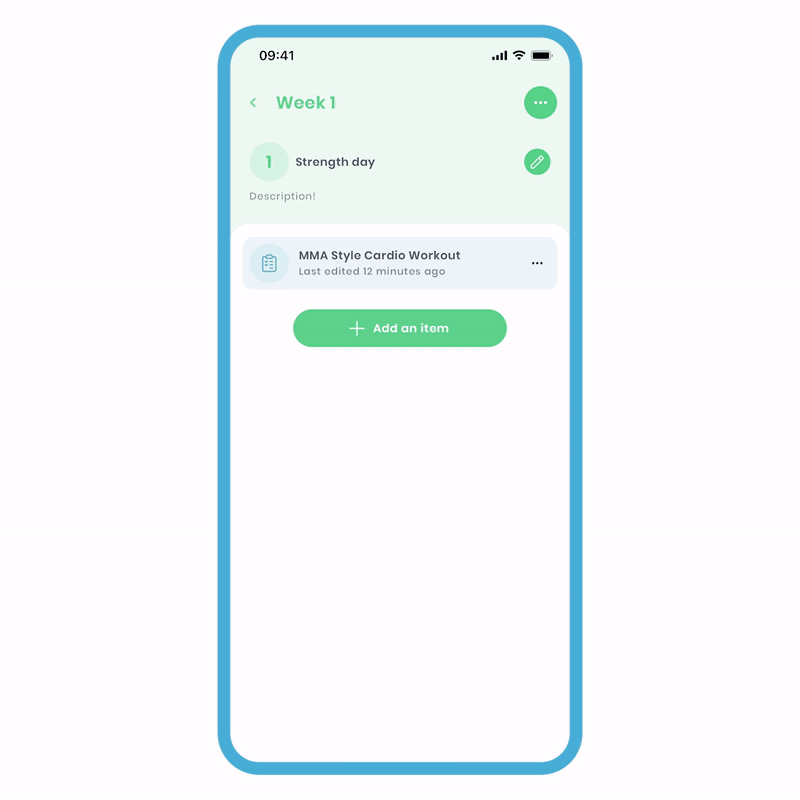
3b - Adding Items to the Day.
Once a day has been added, go inside it by clicking anywhere on the tile except the 'more options' (three dots).
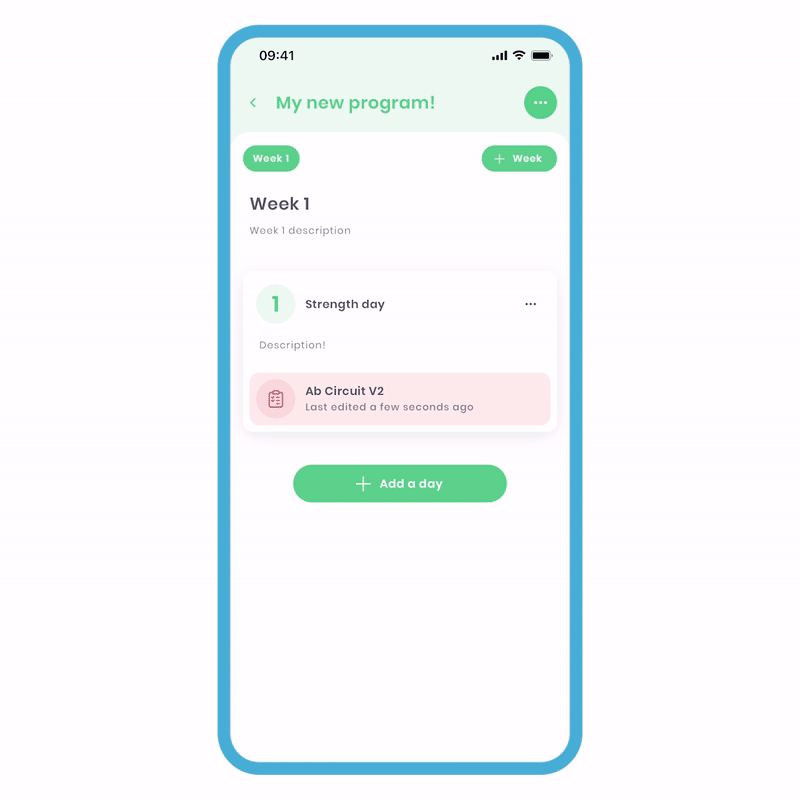
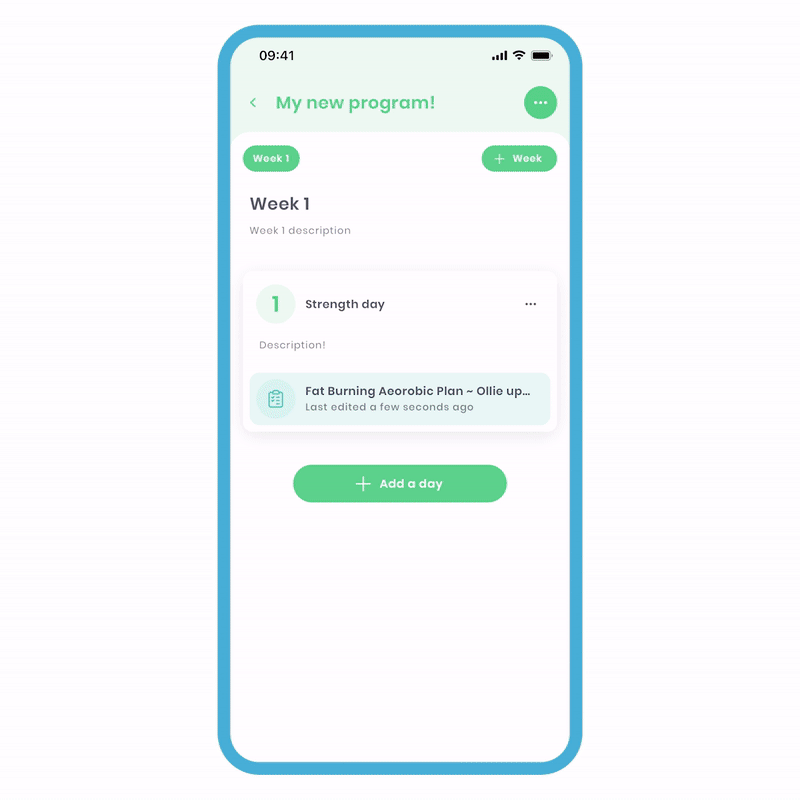
Saved Plans into Program
We've always loved the idea of a pick 'n' mix system. You're welcome to save a plan from our public library, which is built by professionals, and schedule it for specific days.
To do this:
- On the main 'Edit Program' screen, click on the day tile. You should be in the day.
- Click 'Add an item' and then select 'Add a plan.' You'll now see a list of all your available plans. Click the 'Saved' tab at the top, and your saved plans will appear in this list.
- Select the plan you want to be brought to the 'Plan Overview' screen. Click 'Next' and update your targets if you wish. Click 'Add plan,' and you will have successfully added a plan to the day.
As mentioned before, also in this list are those plans you've been sent from a connection. You'll notice on the item tile, you have subsidiary text to aid you in knowing when the item was 'last edited.'
It should also be mentioned that adding a plan creates a copy of the original, allowing you to freely edit it. This is handy if you plan on using the original as a template and making adjustments as needed.
Relating to original
This utilises the master copy of the plan. It's suitable when the plan remains the same throughout the entire program. Any edits made here will alter the master copy and every instance where it is used, so be cautious.
However, if you want to keep the plan structure and change the metrics week by week, relating to the original is the perfect choice. This will ensure that all the metrics are linked in your history (requires update 3.5.1+).
To relate to the original:
- On the main 'Edit Program' screen, click on the day tile. You should be taken to the day view.
- Click 'Add an item' and then select 'Add a plan'. You'll now see a list of all your available plans.
- Select the plan you want to bring to the 'Plan Overview' screen. Click 'Next' and update your targets if you wish.
- Turn on the 'Relate to original' toggle, then click 'Add plan', and you will have successfully added a plan to the day.
Please note that to change the plan structure, this must be done outside the program. If this is done, all the areas where you have related this particular plan will be updated accordingly.
Creating plans within the program
By doing this, you'll create a plan that exclusively belongs to that program. The process is the same as creating any other plan.

To create a one-off plan in the program:
- On the main 'Edit Program screen', click on the day tile. You should be taken to the day view.
- Click 'Add an item' and then select 'Add a plan'. You'll now see a list of all your available plans, and you should be on the 'Created' tab at the top.
- Click the 'Create new plan' button at the bottom.
- On the popup, you can either 'save' this plan to be in your area or 'skip' to keep the plan within the program. Click 'skip', and you'll be launched into the plan builder.
- Create your plan as you see fit.
This can be extremely useful if you don't want to clutter up your plan area with unnecessary content.
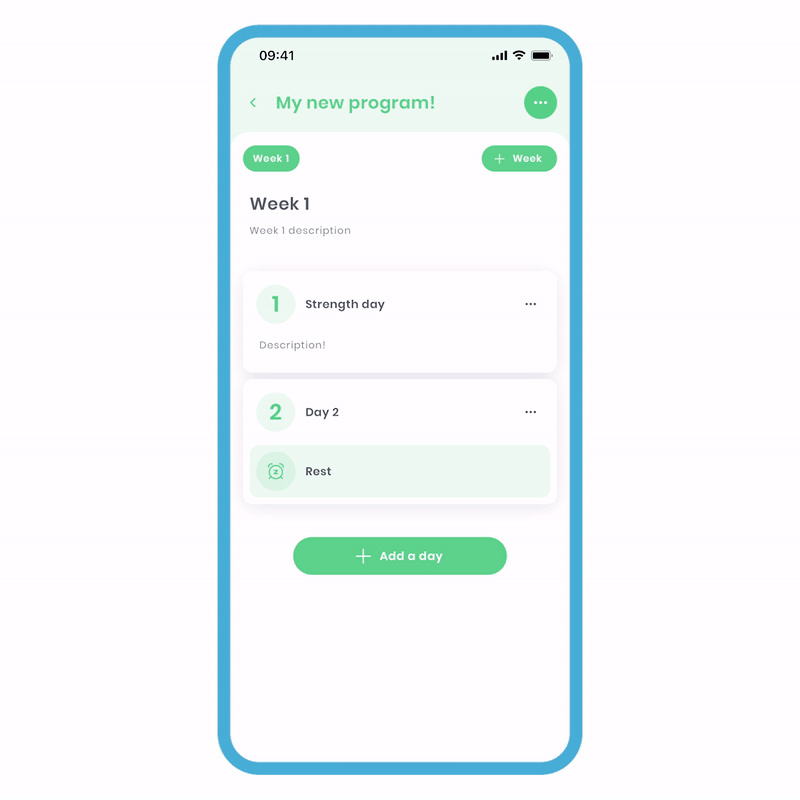
Adding rest days
Rest days can be important to your program, and we've created a mechanism that allows you to create them quickly. There are two methods to achieve this.
Adding a new rest day using the quick method:
- On the main 'Program Edit' screen, click the 'Add a day' button.
- Select the 'Add rest day' option, and this will quickly add a day with a rest item inside it.
If you want to add other items within the day, click on the day tile, and you'll be taken inside the day. Now, you can freely add other items.
Using the 'Within the day' method:
- On the main 'Program Edit' screen, click the 'Add a day' button.
- Select the 'Add new day' option, and you'll be taken inside the day.
- Click 'Add an item' and select the 'Add a rest' option. Now a rest item will be added on this day.
This leads us nicely to editing the items within the day.
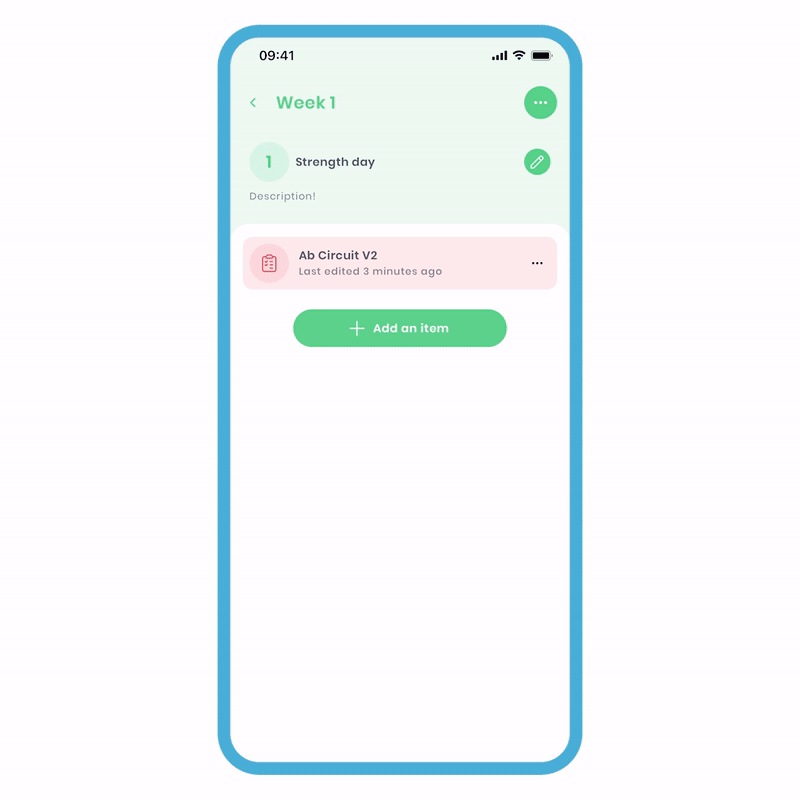
Editing items
By clicking on the main body of the item tiles you've just added, you'll be able to edit them depending on the type of item.
Rest items
You'll be able to add a description and title, just like when editing details of the day and week.
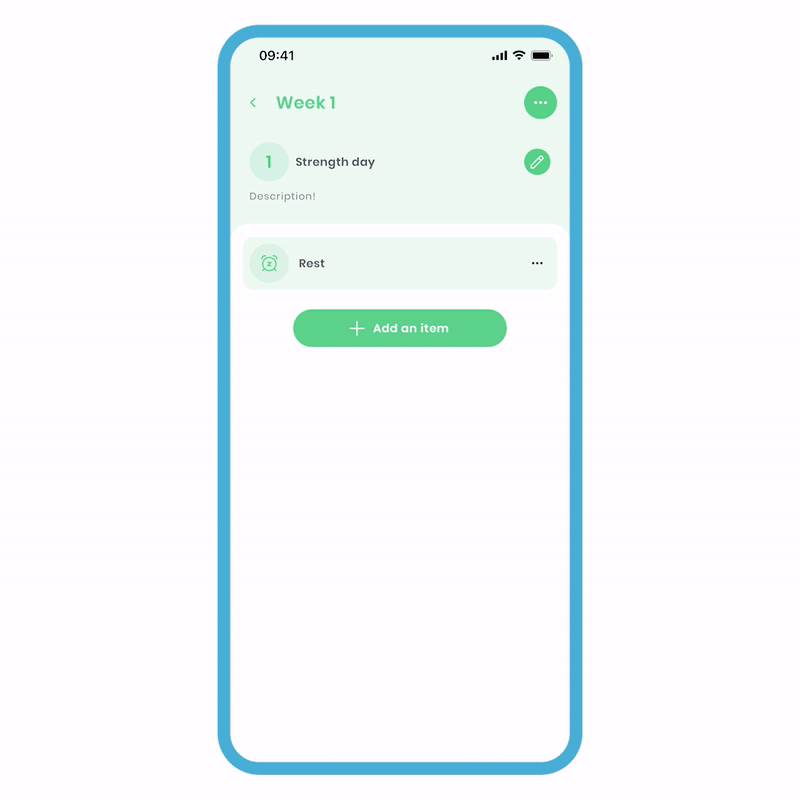
To edit a rest item:
- Click on the rest tile, and you'll be taken to the 'Edit Rest' screen. Here, you can write a title and description.
- Write your message and click 'Save'.
This can be useful if you want to add a personalised message when the completer reaches this day.
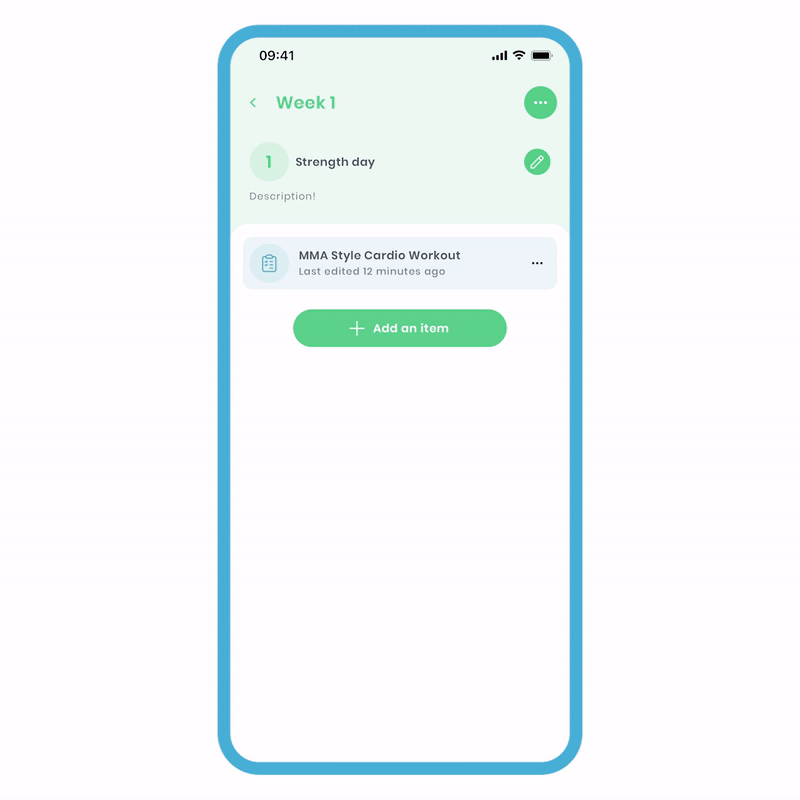
Plan items
By clicking on the plan item tile, you'll be able to edit the plan directly within the program.

To edit plans within the program:
- Click on the plan tile, and you'll be taken to the 'Edit Plan' screen. Here, you can make the appropriate edits.
- Click 'Done,' and a popup will appear to confirm your decision. Click 'I'm done,' and all your changes will be saved.
You'll notice the subsidiary text on the tile will have changed as it informs you of the last time you've updated the item. It should be noted that if a plan is not related to the original, then you'll be brought to the plan edit.
Related Plan items
These items mean that only the metrics can be changed, and the screen will reflect this. It is possible to change the metrics week by week without affecting the original. Your history will show the corresponding arrows as the relationships between plans are still linked. This is perfect for techniques such as progressive overload.
To edit related plan items:
- Click on the plan tile, and you'll be taken to the 'Update Targets' screen. Here, you can make the appropriate edits.
- Click 'update,' and the changes will be saved.
To change the structure of a related plan, this must be done outside the program. Takeaway points from this would be: if you select the plan tile and it:
- Allows you to edit the plan entirely, then it's not related and will not affect the master.
- Only allows you to edit the targets, it's a related plan.
Deleting items
On the tile, you'll notice the 3 dots to the right. This is the 'more options' button, which extends your capabilities. The process is the same for nearly all items on Fitain.
To delete an item:
- Click 'more options' (3 dots) on the right of the item and select the 'Delete' option.
- On the popup, press the 'Delete' button, and your item will be deleted.
3c - More
Programs offer a range of new capabilities on Fitain to make your experience better and smoother. We have upgraded core functionality to reflect this. These extra features are available when you subscribe to our supporter subscription.
Copying, pasting & clipboard
You can easily and quickly copy items, days, and weeks. What makes the clipboard so powerful is its ability to store multiple items.
To copy a day item:
- Click 'more options' (3 dots) on the right of the item and select the 'Copy to clipboard' option.
- Click 'Add', and you'll see the new option 'paste from clipboard'. Select it and click 'paste'. This will paste the stored item onto the day.
You can also copy and paste between different programs. For instance, if you like Week 2 of Program A, you can copy and paste it into your desired program. It doesn’t stop there; you can also copy a plan from your plans area and paste it within the day.
Clearing the clipboard
You can store multiple items in the clipboard to be used at any time. To avoid confusion, you can also clear the items. For this example, we'll clear the clipboard for day items.
To clear the clipboard:
- On the day screen, click 'Add an item' and select the 'paste from clipboard' option.
- On the popup, click the bin icon on the top right.
- In the confirmation popup, select 'Clear,' and the clipboard will be cleared.
Please note that you have to have a copied item in order to see the option.
Takeaway points:
- Can copy and paste plans from your plans area to program days
- Can copy and paste plans from program to program
- Can copy and paste days from the same program
- Can copy and paste days from program to program
- Can copy and paste weeks from the same program
- Can copy and paste weeks from program to program
- Can store multiple copied items in the clipboard
- Can clear the clipboard at any time
- Click the bin icon to clear the clipboard
Duplicating
Duplicating a week is a quick way to copy and paste everything to the following week. This includes items, plans, metrics, days, and details. What's great is that you can specify how many times you want to duplicate the week. First, review your week and ensure it's exactly as you want it.
To duplicate a week:
- On the main 'Program Edit' screen, click 'more options' (3 dots) and select the 'Duplicate' option.
- On the popup, press the minus and plus buttons to choose the number of times you want to copy and paste into the following week(s).
- Click 'done' to confirm.
Keep an eye on the text, as it will tell you the total number of weeks after applying this action.
4 Editing Programs
There are various ways to edit programs for yourself or a sent one that a connection has received.
Editing while completing
You can now make real-time edits, which we find incredibly useful. For example, you can add rest periods to plans or adjust weights for a client.
To do this:
- Click 'more options' (the 3 dots at the top) and select the 'Edit program' option.
- You can now freely make your edits.
However, please note that past days cannot be edited. You can also edit sent and published programs. More on that below.
5 Sharing programs
Sharing content is a fundamental part of Fitain's ethos, and we have created simple mechanisms to do this. If you're familiar with plan sharing, this shares strong similarities. To break this down:
- 5a - Sharing in-app
- 5b - Sharing outside the app (Public/Private)
- 5c - Share and edit (drafts)
- 5d - Editing sent Programs
- 5e - Editing Published Programs
- 5f - Public Programs
- 5g - Publishing Programs
5a - Sharing in-app
Fitain's in-app sharing mechanism is designed for sharing content with your connections. Utilise your connection list to seamlessly share plans and programs within the app. Created content is set to private by default; once shared, it cannot be further distributed unless it is published.
Sharing from your profile
The most common way to share is from your created plan/program screen. From here, you are asked to select the recipient. The process remains the same until you reach the recipients' screen. Let's explore.
Sharing programs
Sharing a program deviates slightly from the plan sharing process. You will be taken to the connection screen, but please note that you can only share with one connection at a time.
To share a program:
- Select the three dots and choose 'share to connection'.
- Select the connection you want to share with and click 'done'.
- A popup will ask if you want to 'share' or share and edit. Click 'Share'.
You have now successfully shared a program with your connection, and they will receive a notification. This will also be displayed in their notification area. Following the same principle as sharing plans, the recipient cannot further share the program with others. Only the original creator can share it within and outside the app.
Sharing from a connection's profile
To save time, we have developed an efficient way to directly share your content with the recipient. The process for sending a plan and program differs slightly, but the fundamentals remain the same.
Sharing Programs from their area:
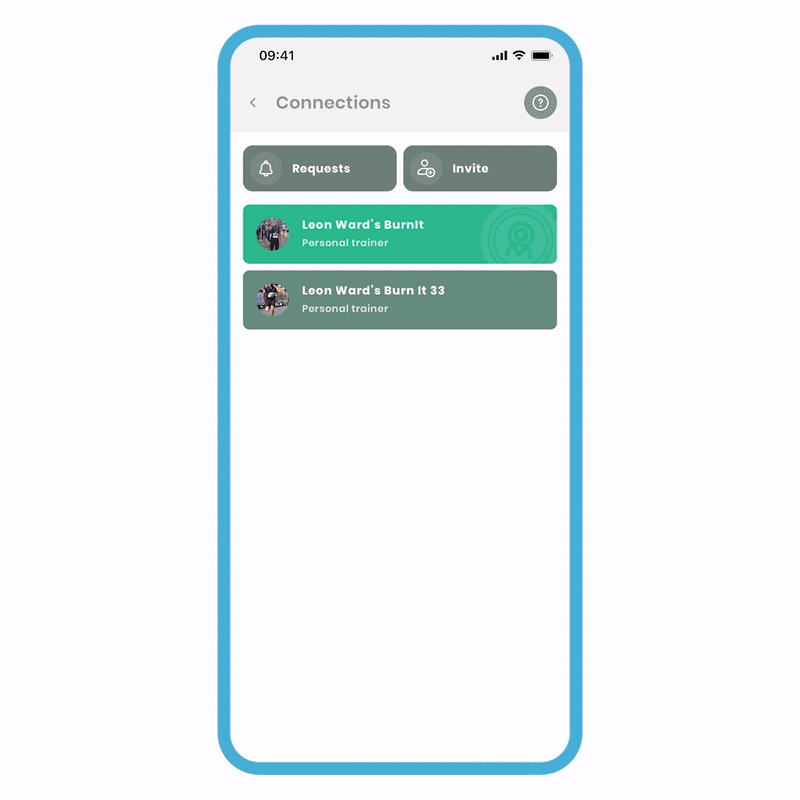
- In your area, navigate to the connections and select the desired connection. You should be in their area.
- Click on 'Programs' and choose the 'Shared' tab.
- At the bottom of the screen, select 'share a program' to access a list of all your programs within your area.
- Choose the specific program you want to share. A popup will appear, giving you the options to 'share' or 'share and edit'. Select 'share'.
As mentioned earlier, these share options will lead you down different paths. 'Share' will immediately send the program, while 'Share and edit' will create a draft that allows you to make edits without affecting the master version. You can choose to send the edited version at a later time.
5b - Sharing outside the app (Public/Private)
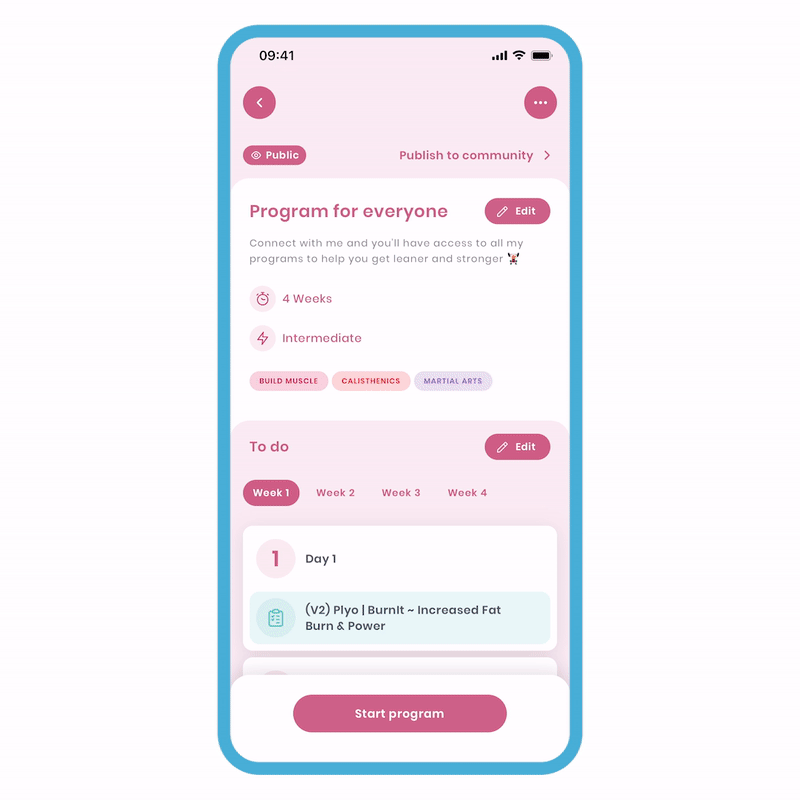
To share content outside the app, the original creator must either set it to public, allowing them to provide a link to others, or publish it on our public library where everything can be shared by others.
Making your content publicly available
To accomplish this, the plan/program needs to be set to at least 'public' by the creator. For this example, we will focus on programs being public and shareable, but the same method can be applied to plans as well.
Public Programs
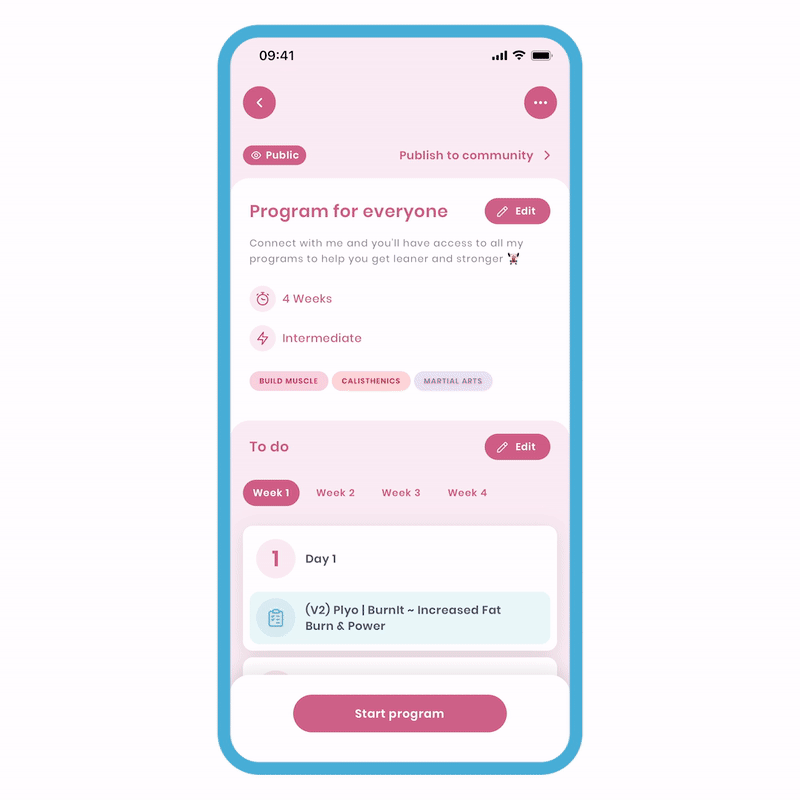
When you mark a program as 'public,' it becomes visible to your connections, who can navigate to your profile and explore the available public programs. This feature fosters a sense of community and sharing within the Fitain platform, enabling you to contribute to the fitness journeys of others while building connections and engagement.
Make a Program Public:
- Select the program you want to make public and navigate to the Program Overview screen.
- Look for the 'Make it public' option under your selected image and click on it.
- In the Program Status screen, flick the switch to make the program public, indicating that it can be viewed by connections.
- Once you have made the program 'public', swipe down or press the 'cross' button at the top right to dismiss the screen.
If you want to share the public program with your connections within the Fitain app, you can also follow the same steps mentioned earlier for sending programs to connections. This allows your connections to easily access the program and benefit from it.
Sharing public content from the library
The public library on Fitain allows everyone to share various content such as plans, programs, exercises, and profiles. If you want to share any of these with individuals who don't use the Fitain app, you can send it outside the app using a link. This feature enables you to reach a broader audience and share your content with people who are not connected to you within the Fitain community.
To share a plan or program outside the app:
- Select the plan/program and go to its Overview screen.
- Tap the 'more options' button (three dots) on the top right.
- Choose the 'share' option, and your phone's native sharing options will appear.
Alternatively, scroll down to find the "share this Plan/Program" option. Tap it to access your phone's native sharing options.
Once the plan or program is public in the Fitain library, you can share it by providing others with the link. They can view the plan without the Fitain app. This feature expands the reach of your content beyond the Fitain community, allowing you to share with a broader audience. Showcase your expertise and provide added value to your customers/followers with our library. It's an upgrade from a PDF!
5c - Share and edit (drafts)
This will create a draft in your programs area where you can freely make edits without affecting the master copy. This mechanism will help reduce clutter in your area.
To share and edit:
- Select the program you want to share.
- Click 'more options' and choose 'send to connection'.
- Select your connection and click 'done'.
- A popup will appear, select 'share and edit'.
Now, this program will appear in your 'drafts' tab with the recipient already pre-selected. You can freely make edits without affecting the master copy. In essence, this allows you to use the original as a template. The recipient will not receive a notification as it is not yet sent.
5d - Editing shared content.
With recent updates, we now provide you with the ability to edit sent content by accessing the connection's profile. This feature saves time and reduces clutter, as you can conveniently make the necessary edits directly in their area. It's a hassle-free way to discreetly update the plan or program you have sent without affecting the master copy.
To edit sent content:
- In your area, navigate to the connections and select the desired connection. You should be in their area.
- Click on 'Programs/Plans' and choose the 'Shared' tab.
- Select the specific plan/program you have sent, and you will be taken to its overview screen. From here, you can freely make your edits.
The recipient will not receive a notification when the edits have been made. This feature is extremely useful if you simply want to modify the metrics of a plan or even alter the entire structure of a program. Once the changes are made, you can send a quick message to inform the recipient that modifications have been applied.
Where to access received Plans/Programs
The Saved tab in your plans/program area is a list that includes all the plans/programs you have received from a connection and saved from the library. It serves as a collection of plans/programs that you have chosen to save for future reference.
Saved Tab
The method applies to both plans and programs, but for this example, let's focus on the Saved Programs tab. The same approach can also be followed for the Saved Plans tab.
To access your Saved Tab:
- Go to your Programs Area, and select the 'Saved' Tab.
- Alternatively, if you've received a program, click on the app notification, and it will directly bring you to the program.
This smoothly transitions us to the Notifications Centre.
Notification Centre
If you happened to miss the notification, you can alternatively open the app and navigate to your Notification Centre.
To access the Notification Centre:
- Open the app and navigate to the Home section (first button on the navigation bar).
- Look at the top right and click on the Bell Icon. This will take you to the Notification Centre.
The Notification Centre serves as the central location for all the notifications you receive. It includes notifications for various activities such as receiving plans, programs, bookings, and notes on bookings, among others.
5e - Editing published programs
When it comes to programs, updates are handled automatically by the creator. We've implemented this approach to provide a seamless and advanced experience. The methodology for un-publishing remains the same for both Plans and Programs.
To edit published Programs:
- Select your program and navigate to the Program Overview screen.
- Click on the 'Pen' icon next to the description to edit the details such as the description, title, interests, and more. Alternatively, click on the 'Pen' icon next to days if you need to modify the entire structure of the program.
- Make the desired edits and save your changes.
5f - Public Programs
Public plans/programs are visible to all your connections and can be easily shared outside the app using a simple link. This feature is useful for sharing your created content with friends, family, or for business purposes to enhance relationships. Say goodbye to PDFs as the process is the same for both plans and programs.
Make a Program Public:
- Select the program you want to make public and navigate to the Program Overview screen.
- Look at the top right corner and click on 'more options' (the three dots), then choose 'Program Status'.
- In the Program Status screen, flick the switch to make the program public, indicating that it can be viewed by connections.
- Once you have made the program 'public', swipe down or press the 'cross' button at the top right to dismiss the screen.
Now, you can send it to your connections in-app and share it outside the app to expand your reach. Anyone can access the plan/program by visiting your profile. Non-Fitain users can download and experience your work, which is especially valuable for those with large social media followings aiming to strengthen relationships.
5g - Publishing programs
Publishing on Fitain offers numerous professional benefits. Our platform provides a unique proposition that caters to the needs of all users. This allows PRO’s to:
- Monetise your knowledge (notifications will be sent to professionals once this structure is implemented).
- Showcase expertise for potential opportunities.
- Build healthy, collaborative relationships with Fitain.
The process is identical for both Plans and Programs. Please note that Programs may require additional time for review since they consist of multiple Plans organised for specific days. We will thoroughly assess each Plan within the Program.
On the Overview screen:
- Go to 'Plan/Program Status' and switch it to 'Public'.
- Click on 'Request Publish'.
Fitain will review your submission to ensure quality.
Once a decision is made, you will receive a notification and feedback from us. Your content will be marked with a 'Published' stamp to indicate its status. Remember, you have nothing to lose and everything to gain! We encourage diversity in our search, seeking different styles, uniqueness, and fun. Let's provide varied plans and Programs for everyone's benefit.
Each plan and program is individually assessed by the Fitain team to ensure top quality. Our criteria include:
- Duty-free image (use Pexels).
- Description.
- Appropriate equipment added.
- Safe routine with suitable reps/sets, etc.
It's that simple.
We value our relationship with PROs and appreciate your contribution. Being on the public search means you'll also be visible on the website. We may also feature your Plan/Program in an Ad campaign to showcase your work for free.
6 Completing Programs
Now that the structure of the program is complete, the fun part is actually doing it. It makes a big difference when you complete plans, and the targets are already pre-set week by week, plan by plan.
Starting the Program
To start a program, click the 'start program' button on the main page. Once you've started a program, the main screen will change to reflect this.
- 6a - Starting the Program.
- 6b - More Options with the Started Program.
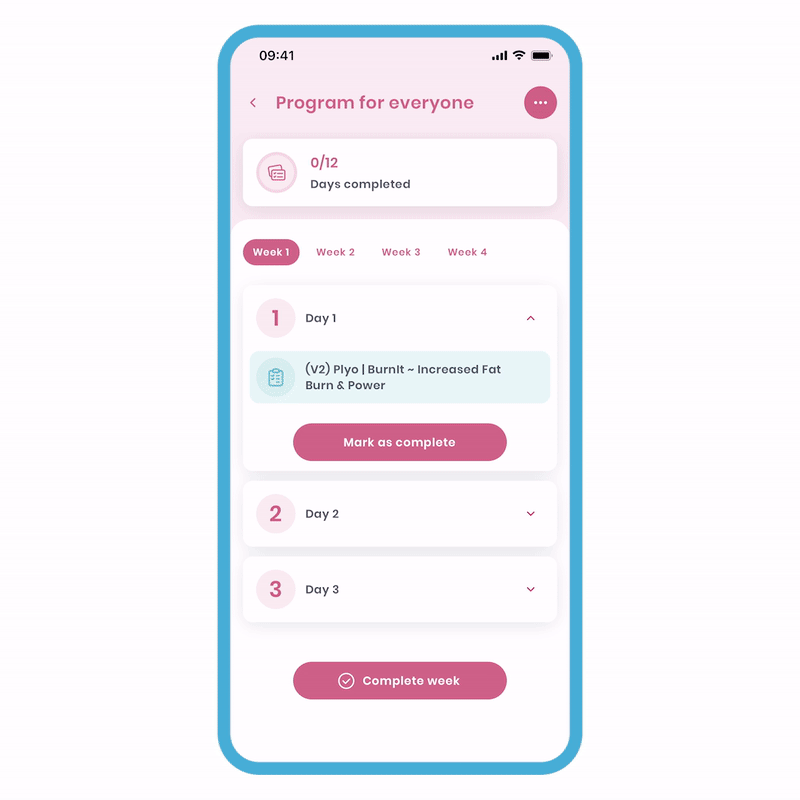
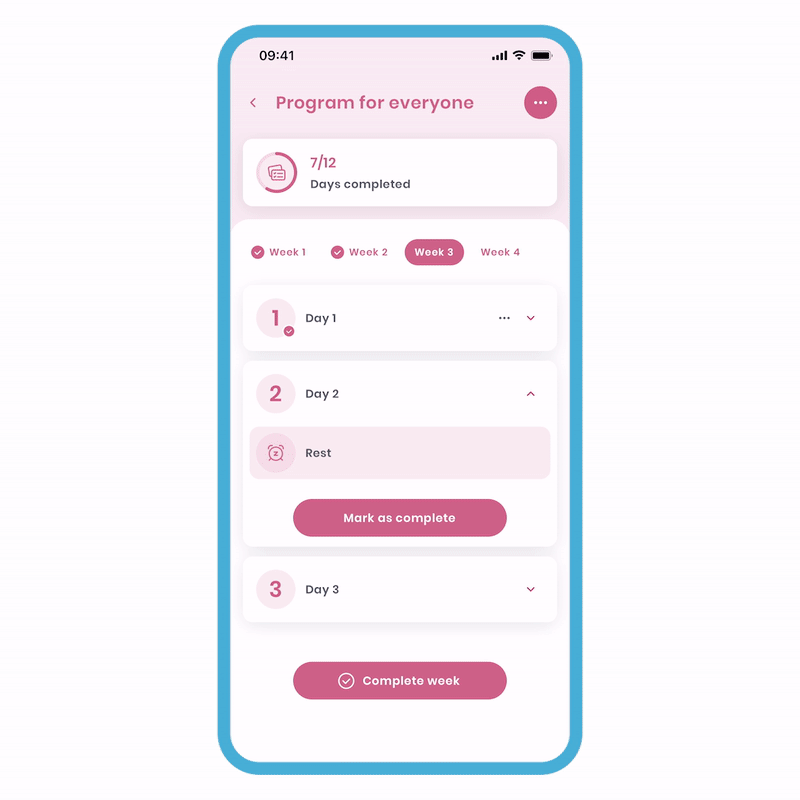
6a - Starting the Program.
To Start a Program:
- On the main ‘Program’ screen, click ‘Start program’. You’ll notice the screen changes to its ‘started state’.
- Select the items for the days and work your way through.
Gradually progress through each day and week until you finish. We understand that life happens, such as doctor appointments or unexpected events. That's why we've designed the program to be flexible, allowing you to go at your own pace without pressure.
It’s also possible to start multiple programs at the same time. Maybe you have a meditation program and a physical exercise program you want to start at roughly the same time. No problem, as mentioned in other tutorials, we champion flexibility and want Fitain to be a vehicle for you to have a great health and fitness journey.
6b - More Options with the Started Program
Once the program is in its started state, you have a range of options available to you.
Editing the Program
We’ve mentioned this earlier, but it’s possible to freely make edits while you’re completing the program. Please note that you can’t edit days that have passed.
To edit in progress:
- Click ‘more options’ the (3 dots at the top) and select the ‘Edit program ’ option.
- You can now freely make your edits.
Add days, additional items, weeks or even delete certain items. The power is in your hands.
Mark Program as Complete
If you want to finish the entire program, this option will allow you to do so.
To do this:
- Click 'more options' (the 3 dots at the top) and select the 'Mark program as completed' option.
You’ll be brought to the completed page.
Reset Program
This will remove all the current progress within the program and make you start the program again. You'll have an option to keep your historic logs within the program.
To reset the program:
- Click 'more options' (the 3 dots at the top) and select the 'Reset program' option.
- On the popup, you will be asked to choose between 'Keep history' or 'Delete history'. Choose and confirm your preference.
Keeping the history will mean any progress made within the program will be shown in your history. On the other hand, deleting the history will remove all logs associated with the program from your history.
Abort Program
Just like plans, this option will reset the program and change it to its inactive state. All progress will still be logged in your history.
To abort the program:
- Click 'more options' (the 3 dots at the top) and select the 'Abort' option.
- On the popup, you will be asked to confirm your decision. Click 'Abort'.
Now, the program has returned to its inactive state for you to 'start the program' again at your own convenience.
As you can see, we've been hard at work, and now it's time for you to have fun creating, sharing, and completing! We believe this feature will be well-received, and we can't wait to see what you come up with!