Tutorial - Plans | Wizard View
Plans on Fitain
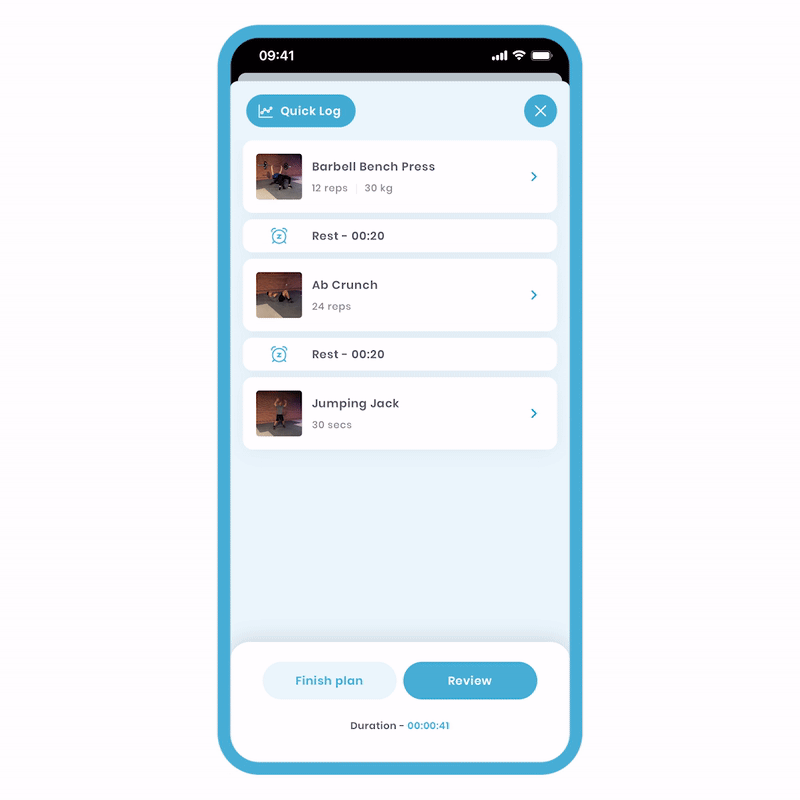
With our plans, you have the flexibility to choose between the Wizard View or Quick Log View, each offering unique advantages.
This tutorial will focus on the popular Wizard View, providing access to the timer, stopwatch, exercise videos, and step-by-step guidance. Also, a progress bar which visually tracks your completion.
So, let's explore the Wizard View in detail, showcasing the possibilities of our versatile app. The main areas covered include:
- Wizard View Basics
- Timer & Stopwatch
- Notes
Tracking your achievements on Fitain is crucial for reviewing your past progress.
1 Wizard View Basics
Let's begin by exploring the basics of the Wizard View. In this section, you will learn how to:
- 1a - Access the Wizard View.
- 1b - Complete an Exercise.
- 1c - Rests.
- 1d - Navigation.
- 1e - Reset an Exercise.
Let's dive in and get started.
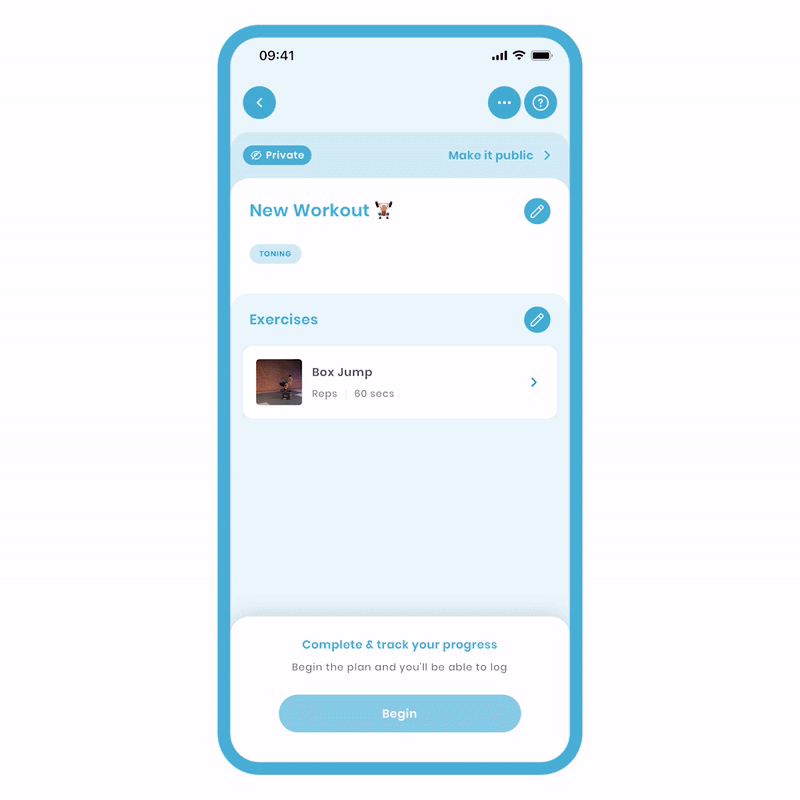
1a - Access the Wizard View
All you need to do is start a plan. It's as simple as that!
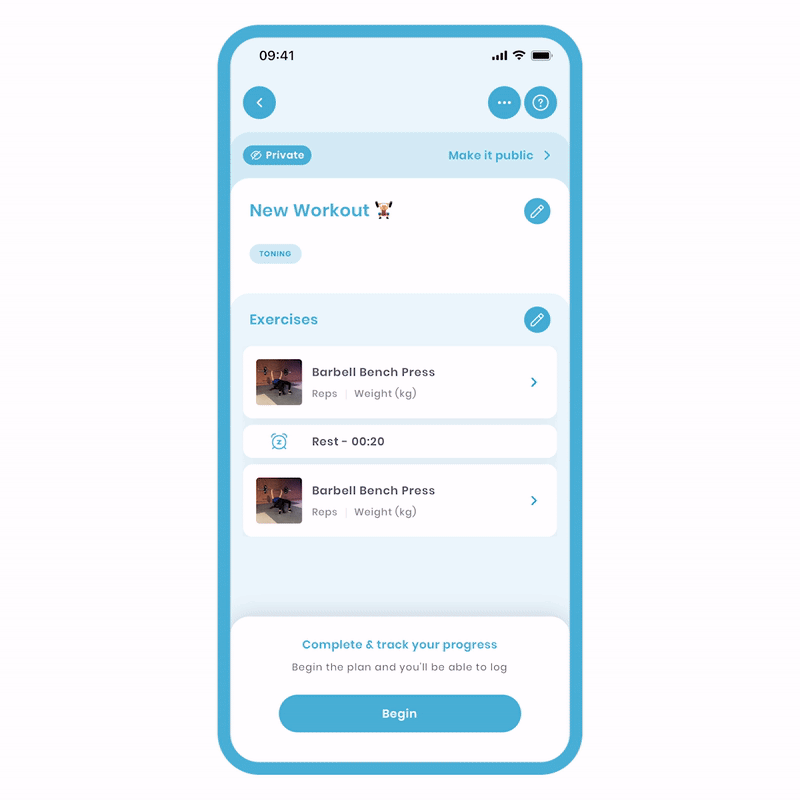
To start the plan, follow these steps:
- On the Plan Overview screen, click the 'Begin' button at the bottom. This will take you to the Plan Progress screen.
- In the list, click on the flashing exercise to enter the Wizard View.
In the Wizard View, you can watch video demonstrations of exercises and access step-by-step guidance by scrolling down. The time duration will count up and be timestamped when you complete the entire plan.
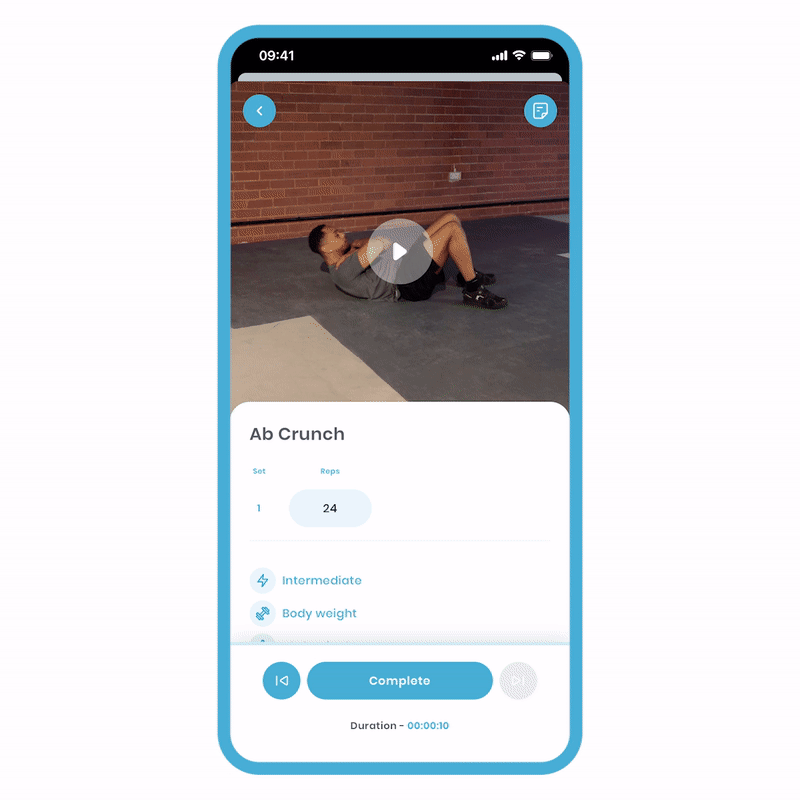
1b - Complete an Exercise
Simply, input what you've done and complete.
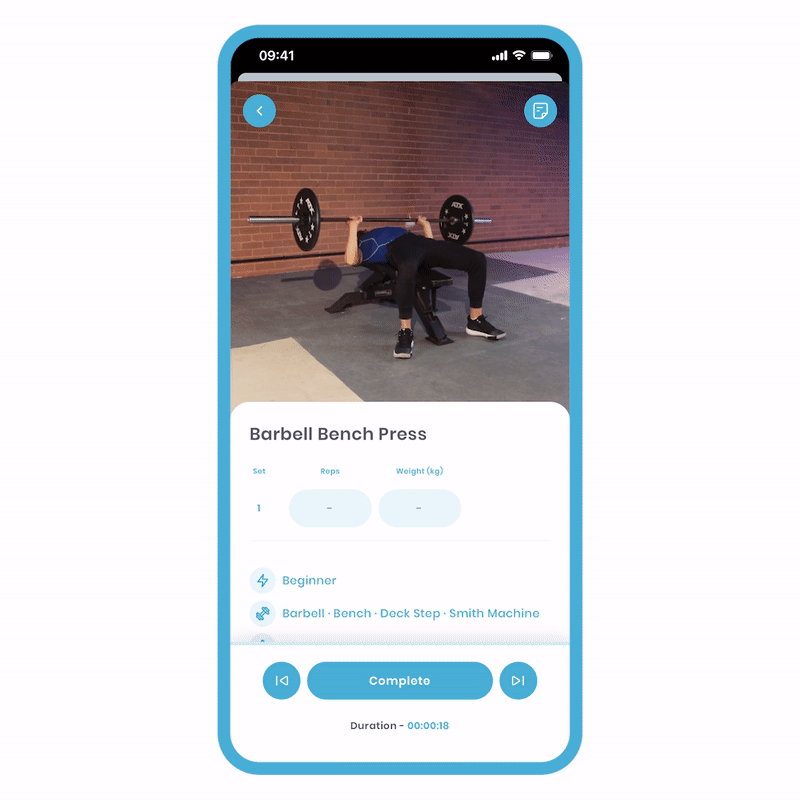
To complete an exercise, follow these steps:
- Perform the exercise according to the instructions.
- Input the relevant metrics, such as repetitions or weights lifted.
- Click on the 'Complete' button to finish recording your results.
Make sure to pay attention to the trackable metrics provided and enter your data accurately. If there are no specific metrics for an exercise, feel free to go at your own pace.
1c - Rests
When you 'complete' an exercise, there may be a designated rest period to allow you to catch your breath.
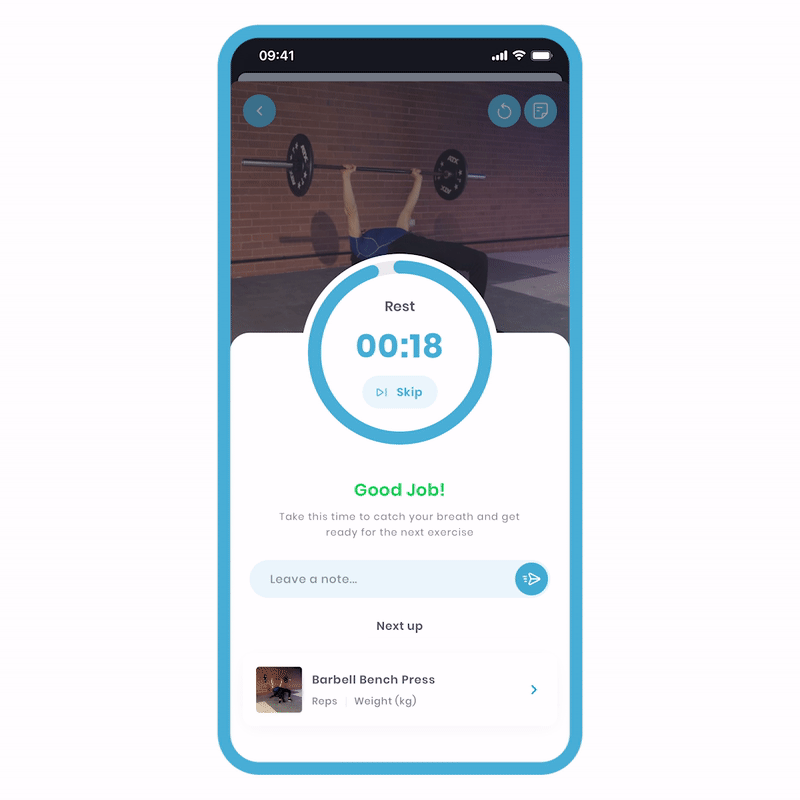
To take a rest:
- After completing an exercise, wait for the specified rest period.
- Utilise this time to relax and recover before moving on to the next exercise.
During the rest period, you'll see a timer counting down and the progress circle filling. If you feel the rest is not needed, you have the option to skip it. In that case, you'll be taken to the next exercise.
1d - Navigation
You can navigate between exercises using the right and left buttons located next to the complete button. This feature is useful if you don't have access to specific equipment required for an exercise at a given time. Simply skip to the next exercise and come back to it when you have the necessary equipment available.
To skip forward or go back:
-
Use the right button to skip to the next exercise.
-
Use the left button to go back to the previous exercise. Please note that if you have already completed the previous exercise, it will be shown as completed. The next section will explain how to reset it.
To access the Plan Overview Screen:
- Tap the back button located at the top left of the screen.
Regardless of your current position in the Wizard, this button will reliably bring you back to the Plan Overview Screen. Here, you can track your progress by observing the ticks on the exercise images.
1e - Resetting an Exercise
If you made a mistake, want to add a note, or simply wish to redo the previous exercise, don't worry. You have the flexibility to reset the exercise without any issues.

Let's go through the steps:
- Press the left button next to the 'Complete' button. This will navigate you back to the previous exercise.
- On the top right of the screen, you'll find the reset button (an arrow). Click on it.
Once pressed, you'll need to go through the exercise completion process again.
Pen & Paper in 2023?
2 Timer & Stopwatch
For each exercise, you can choose which metrics to track. The time metric is a special one. When selected during the plan creation phase, you can activate the timer, stopwatch, and override the timer. We'll explore how to:
- 2a - Activate the Timer.
- 2b - Activate the Stopwatch.
- 2c - Overwrite the Timer.
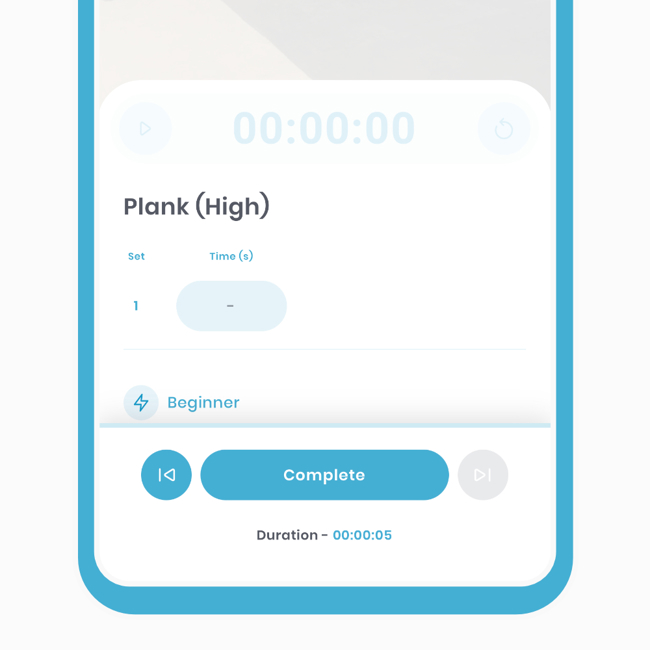
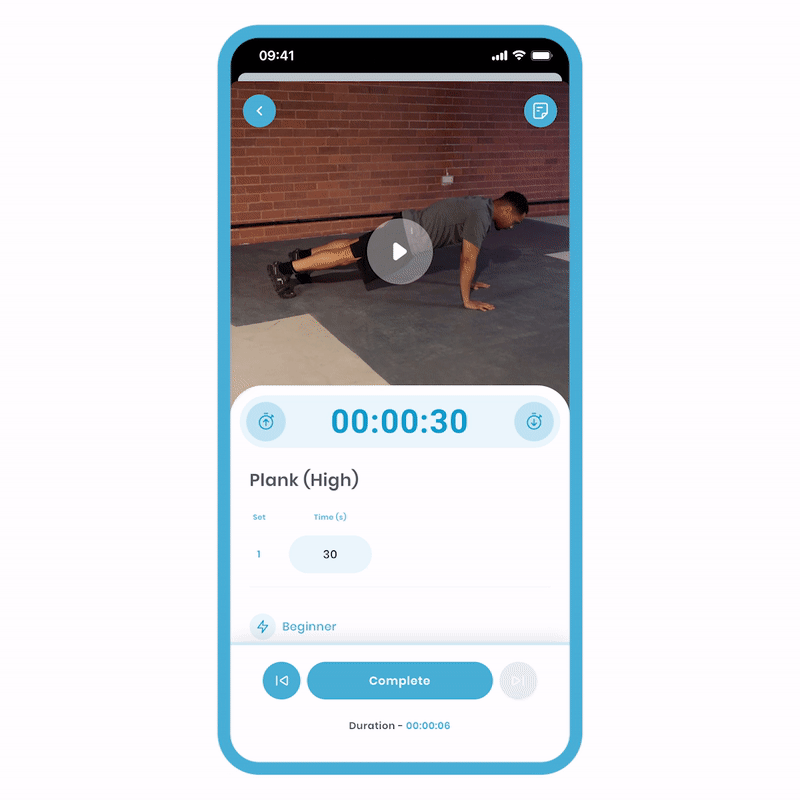
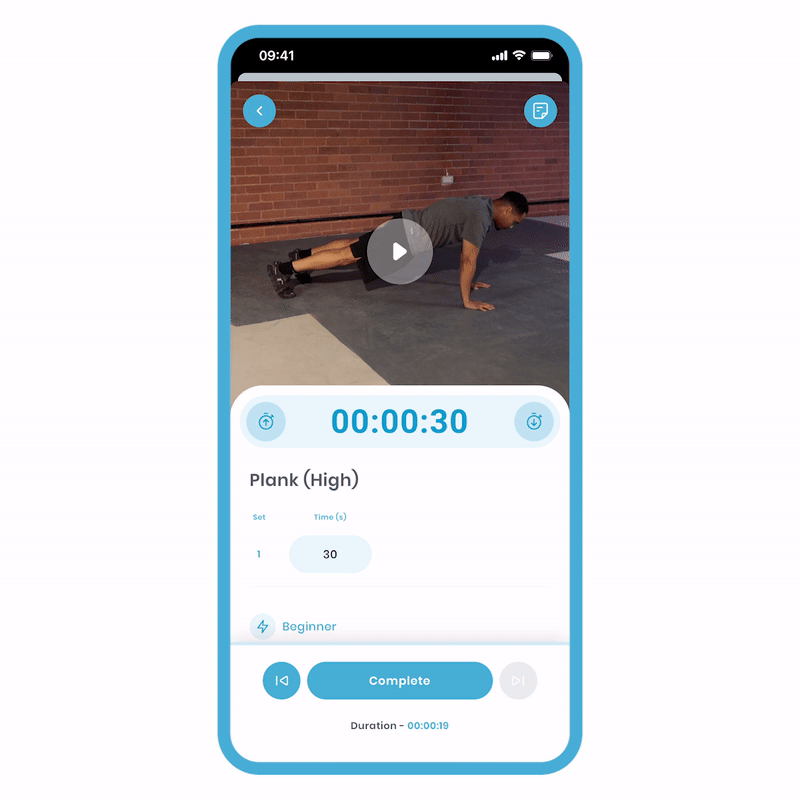
We'll use the Plank exercise as an example in all three scenarios. Let's see how it's done.
2a - Activate the Timer
This is the most common use of the Timer Metric. When an exercise has this feature enabled, you'll see it in the wizard view. For this example, the Plank exercise has a designated time of 30 seconds.

Let's look at the steps involved:
-
Click the 'Timer' icon on the right (the time icon with an arrow pointing down). The Timer icon will change into a reset icon.
-
Click the 'Play' icon. You will have a 3-second grace period to get ready.
You will see the timer progress bar fill up. When the time is up, you will hear a beep. Now, a 30-second Plank exercise has been logged.
2b - Activate the Stopwatch
A strong use case for the stopwatch is to measure how long you can hold a plank. Let's explore how to do this.
During the plan construction, the Time metric has been added without specific targets. By default, the stopwatch will be available for you to activate.
Let's look at the steps involved:
- Click the 'Play' icon. You will have a 3-second grace period to get ready.
- Click the 'Pause' button to automatically log your time.
The stopwatch can be activated at any time, even if the timer is pre-programmed. In such cases, the target time will be reset to 0 in order to count up.
2c - Overwrite the Timer
Let's say a 30-second Plank is not challenging for you, and you want to set a target of 40 seconds.
To overwrite the Timer, follow these steps:
- Tap the middle of the time modal. This will take you to the Timer screen.
- Choose a preset time or enter a new time. Note that selecting a preset will add to the current time.
- Tap the Timer icon (clock with arrow pointing down).
- Click the 'Play' icon and you'll have a 3-second grace period to prepare.
- Press 'Done' to return to the previous screen, which will log the new time.
In all scenarios, each method has its advantages. The Time Metric offers great versatility, allowing you to customise and track your exercise durations.
3 Notes
Notes are incredibly useful for adding additional information or comments to a specific exercise set. They are visible in your history and can provide valuable insights. There are two types of notes we'll discuss: personal notes and creator notes.
- 3a - Notes to yourself.
- 3b - Notes from the creator.
- 3c - Where to find notes.
3a - Notes for yourself
These notes are highly valuable for reviewing your exercise history and gaining insights into your progress. Details such as "Failed on the 9th rep" provide invaluable information that helps you track your development over time. They contribute to building a comprehensive picture of your fitness journey.
To add a personal note:
-
Complete the exercise.
-
Type your note on the completion screen and click the 'Send' icon. Your note will be logged for that exercise.
If there's a rest period when you write the note, the app will not automatically move to the next exercise to allow you sufficient time.
3b - Notes from the creator
By utilising notes in this manner, you receive additional instructions from the creator. In this example, the creator instructs you to perform the exercise using the AMRAP (as many reps as possible) technique. While the Time metric has a target, the Reps target intentionally remains blank.
3c - Where to find notes
There are several locations where you can access these notes.
Within the Wizard:
- Click on the notes icon located at the top right of the screen.
This will take you to a separate screen where you can view all the notes associated with the exercise.
Historic View:
After completing a plan, you can view all the loggings associated with it, including metrics and notes.
To look at all historic notes:
1 - Complete the plan. You will then be taken to its historical version for review.
If someone has sent you the plan, they will have access to view all the notes and metrics. This feature is particularly useful for professionals to monitor their clients. Further details about this topic will be covered in another tutorial.