Tutorial - Plans | Aborting
Fitain Plans empowers you to track and log exercise data efficiently. Dive into our detailed tutorial to discover the best practices, including plan tracking and how to abort or stop plans in progress.
Experience the ease of logging your results, modifying targets, and taking control of your fitness journey.
Tracking Results Plans
Once you begin a plan, the duration is time-stamped and recorded in the historic view, allowing you to track and gain valuable insights for your journey. You also have the ability to start multiple plans at the same time. Let's get started with the wizard view:
Ready to kickstart your plan? Here's how:
-
Navigate to the 'Plan Overview' screen.
-
Click 'begin' to launch the plan, and watch the duration timer start counting from 0.
-
Click the flashing exercise.
-
Log your results and click 'Complete'.
Note: This example comes with pre-programmed targets, so simply perform the exercises with the right weights and sets. Feel free to customise the targets whenever you wish.
Aborting Plans in Progress
Life happens, and we understand that. If you need to abort a plan in progress, we've got you covered.
Instead of abruptly ending your plan and losing your progress, we've implemented a different approach. If you don't manually abort, the plan will continue running in the background.
To prevent this, you have two options:
1 Complete the Plan
When you're ready to finish a plan and have it logged in your history, simply click 'Complete'. There are three ways to do this through the:
- 1a - Wizard View
- 1b - Plan Progress Screen
- 1c - Quick Log Screen
Let's explore each method in detail.
1a - Wizard View
Completing a plan with Fitain is most commonly done through the comprehensive Wizard View. It offers various features such as video demonstrations, attached notes, step-by-step written guidance, a timer, and a stopwatch for enhanced workout experience.
From here (last exercise):
- Press 'Complete' and optionally write a note for the completed exercise.
- If you don't want to write a note, press 'Complete' again to proceed to the Historic view of the Plan.
Now, let's explore another option.
1b - Plan Progress Screen
The Plan Progress screen is your first destination upon starting a plan. It provides a detailed overview of completed and pending exercises, with a tick mark on the thumbnail indicating completion status.
From here:
- Look for the 'Finish Plan' button at the bottom.
- From the Wizard View, click back or swipe the screen from left to right.
- Click 'Finish Plan' and confirm by clicking 'I'm done' in the popup.
And for the final option.
1c - Quick Log
Designed for efficiency and experienced users, Quick Log provides a straightforward interface without unnecessary distractions. Access the autofill feature to streamline entry logging. Although lacking rests, timer, stopwatch, and notes, Quick Log offers a no-frills approach to swiftly record your results.

From here:
-
Type in your metric results in the provided fields. If pre-programmed targets are available, perform the exercise accordingly. You can also overwrite the targets if needed.
-
Lock in your results by clicking the tick symbol on the right.
-
Click 'Complete' to finalise and log your input.
Note: Make sure you click the tick symbol to confirm and save your results; otherwise, nothing will be logged.
Let's quickly take a look at the Historic view of your plans.
Completing the plan ensures that your efforts are recorded and your fitness journey is accurately tracked.
Now, let's explore the second option.
Pen & Paper in 2023?
2 Manual Abort the Plan
If you choose to manually abort a plan, the stopwatch counter will be immediately stopped, and the plan will not be recorded in your history. All the exercises and their progress will be lost. To ensure the plan is logged in your history, it must be completed rather than aborted. You have two options methods:
- 2a - Exiting from the Plan Progress Screen
- 2b - On the Plan Overview Screen
For the first method.
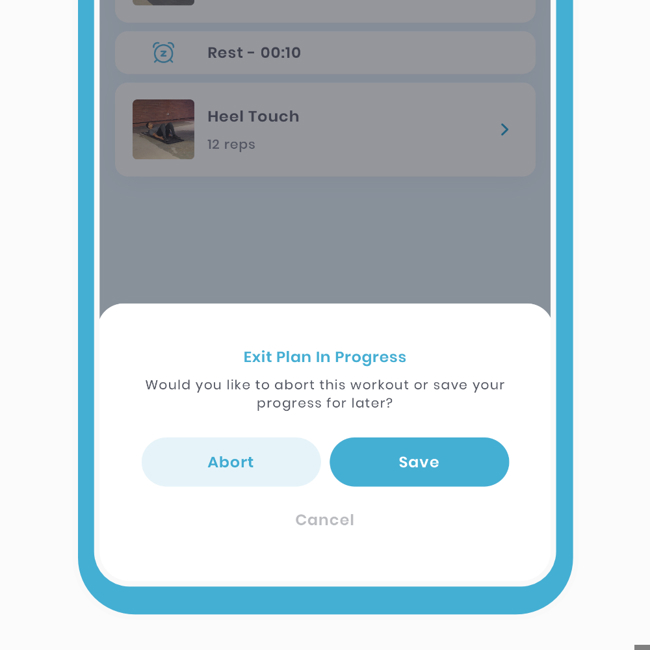
2a - Exiting from the Plan Progress Screen

- Click the 'x' at the top right of the screen or swipe down from the top to close the window.
- On the popup, click 'Abort'.
Please note that this is a potentially destructive action, so we'll ask for confirmation before proceeding.
Now for our second method.
2b - On the Plan Overview Screen
- Click 'More Options' (the three dots at the top right).
- Select 'Abort' from the list.
This second method is intentionally hidden to prevent accidental activation.
Plans Running in the Background
We have implemented this mechanism to ensure you can seamlessly resume from where you left off. We recognise that life can interrupt your fitness journey, and we don't want you to lose your progress. Therefore, this fallback option is available to save your progress. Here's how:

- On the Plan Progress screen, click the 'x' at the top right or swipe down from the top.
-
A popup will appear, asking if you want to save your progress. Click 'Save'. You will then be taken to the Plan Overview screen, where you will notice changes in the bottom actions. This serves as the first indicator.
The second indicator is to navigate to your Plans Area and check the 'Active' section.

- Navigate to the Plans Area and view the list of active plans at the top.
We've got your back in case of unexpected events. These fallbacks and safety measures are designed to support you throughout your fitness journey.