Fitain - Bookings Area
As part of our client management tools offered on Fitain, we have developed a simple yet powerful booking system. It provides professionals with a more fitting approach compared to standard calendar solutions. The best part is that this booking system is completely free. Let's break down its key features:
- Bookings
- Extras
As professionals, you can utilise our range of free tools to create bookings, develop plans/programs, and connect with as many clients as possible, among other functionalities. We firmly believe that the aforementioned features will meet the majority of your needs. Additionally, we are continuously working on adding more features to further enrich your experience.
Getting to the Bookings Area
In this section, professionals can create bookings and manage received invites. For this tutorial, we'll use a professional account.

To access your bookings area:
- Navigate to 'Your Area' (4th option on the navigation bar).
- Click the 'Bookings' tile to enter the area.
As a management tool, the ability to book connections is exclusive to professionals. It's important to note that professionals can book appointments with other professionals, treated like any other 'client.' Future plans include making it more useful for both casual users and pros.
Toggling View
You have the option to toggle between viewing upcoming sessions for the day or a listing view that displays all bookings. Each view offers its unique benefits.
List View
This view is best suited to see all your bookings in a single list.
For unconfirmed bookings, the tiles will appear faded (more on this later).
Day View
In this view, you'll have access to the mini calendar, enabling day-by-day or even month-to-month navigation.
This is particularly suitable for busier schedules.
You can change your view at any time, and each time you return to this area, the app will remember your preferred choice.
1 Bookings
Bookings are a fundamental tool for delivering your expertise, whether it's through remote or local sessions. This section will cover all the booking basics, divided into the following:
- 1a - Creating a booking.
- 1b - Receiving a booking.
- 1c - Cancelling a booking.
Please note that 'booking' and 'session' will be used interchangeably.
1a - creating a booking.
We have designed a quick, straightforward, and efficient way to create bookings. The best part is that our bookings appear in both your and the recipients' history, making tracking easy to see how many bookings you have agreed to. Please note that the recipient must accept the booking for it to be shown in both your and their history. The process remains the same for both remote and in-person bookings.
Remote Bookings
You can add a personal link within the field, where the recipient(s) can access it. This can be anything you use, such as FaceTime, Zoom, Skype, Microsoft Teams, and more.
To create a remote session:
- Click 'make a booking,' select the connection(s) you wish to add, and click 'Next.'
- Choose 'Create custom booking' for a 'one-off' session. If you have available services, they will be displayed here and are designed for reuse.
- Fill out the 'name' and 'duration' fields in the 'New booking' screen.
- Select 'location' and click the 'Remote' tab at the top. Paste your link here and click 'Done.'
- Pick a suitable date and time, then click 'Review.'
- Review your details and click 'confirm and create.'
Editing/Changing a Link
If you have forgotten to add a link to the remote session or wish to change it after the booking has already been created, don't worry; you can easily do so.
Editing/Changing link steps:
- On the bookings screen, click 'more options' (3 dots) at the top and select 'Edit details.'
- Paste the link in the remote link field and click 'Save.'
The participant(s) will have access to the link. This can also be done with a remote service (more on that later).
Local Bookings
As the name suggests, our flexible bookings system also enables you to create local bookings at a physical location. The setup is the same, but this time, we'll add a location to the booking.
To create a local session:
- Click 'make a booking,' select the connection(s) you wish to add, and click 'Next.'
- Choose 'Create custom booking' for a 'one-off' session. If you have available services, they will be displayed here and designed for reuse.
- Fill out the 'name' and 'duration' fields in the 'New booking' screen.
- Select 'location' and enter the postcode or name of the location. If the location has been used before, you can quickly select it from the list.
- Pick a suitable date and time, then click 'Review.'
- Review your details and click 'confirm and create.'
The difference here is that instead of a remote link, recipients have access to a mini-map. They can click on it and use their phone's navigation to get to the booking location.
It should be noted that once you decide to make a booking, whether remote or local, these types cannot be changed once the booking is created. If you wish to change a remote booking to a local one, you must cancel the session and start a new booking using the local type.
Notes on Bookings
As a professional, you have the ability to organise sessions with one or multiple participants, and you can add notes to these sessions. In this case, the recipient(s) will receive a notification each time you add a note to the session. This feature is useful as it eliminates the need for multiple messages and allows you to communicate important information in one go.
To make a note on the session:
- On the Booking Overview screen, select the notes field and write your note. Click the send icon, and a notification will be sent to all recipient(s).
Please note that all participants will be able to see the note, but it is not a forum where they can respond. If you wish to communicate with an individual privately, it is recommended to send them an individual message.
Rebooking from History
Your history area comprises of two activities you've completed on Fitain: bookings and plans. As mentioned in other tutorials, you can use colours to distinguish trends. As professionals, we understand how precious your time is. In this tutorial, we want to show you how quick it is to rebook the same connection for another date. Please note:
- If you're the recipient, the host's name will be at the bottom of the tile.
- If you're the host, the recipient(s) will be at the bottom.
This extract has been taken from another tutorial.
To rebook from history:
- Select the historic session log, taking you to the Historic Overview screen.
- Click 'Book again' at the bottom.
- Choose an available day and time, review the details on the receipt screen.
- Click 'Confirm and create'. A new invitation will be sent to the participant.
Please note, this is only available for bookings with a single participant. Ideal for providers offering 1-to-1 bookings.
Booking Tiles
In the Bookings area, you'll notice that unconfirmed bookings are slightly faded out on the Bookings Tile. This visual cue helps in easily identifying the status of the bookings.
The Booking Tile will turn solid when you confirm that you can make the booking. This visual change indicates that the booking is confirmed and ensures clarity in your schedule.
Pen & Paper in 2023?
Awaiting response from a booking
If you're the host of a booking and waiting for a response, you can send a message from this section. We understand the significance of bookings and have designed this feature to make it easy for you to follow up if necessary.
Once a booking is made:
- On the bookings screen, click on 'Participants' to see all the connections you've added.
- At the top of the screen, click 'Send Message' to navigate to the messages screen.
- Type in your message.
Please note that if there are multiple connections in the booking and you choose to send a message, it will not create a group chat. Instead, individual messages will be sent to each person. For creating a booking, please refer to other tutorials where we provide a detailed explanation.
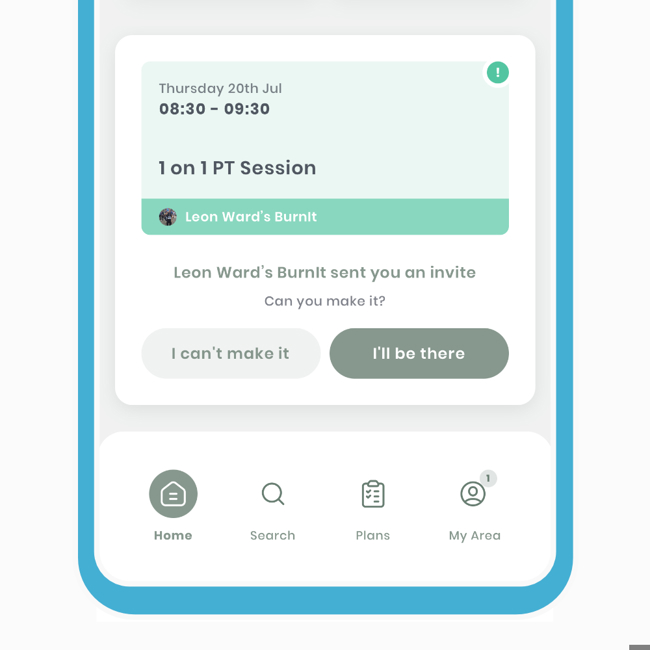
1b - Receiving a booking.
As this is such an important tool in a professional's world, we've designed engaging recipient responses to be quick and easily accessible. You'll be able to access the responses in a few ways, letting the host know as soon as possible, in hopes of making life easier for both users.

The recipient will be:
- Greeted with a notification once the invite has been sent.
- On the dashboard, they'll see the invitation where they can respond quickly.
- It will be in the notification area for ease of access.
- Receive a number notification on the area navigation and the bookings area to indicate if something needs to be actioned.
All of the above happens seamlessly, ensuring that each party knows where they stand.
1c - Cancelling a booking.
Sometimes, life happens, and we've made it easier for both the host and/or recipient to cancel. The journey and outcome differ slightly for the host and recipient.
Host cancelling
This will remove the recipient(s) from the session and cancel the booking. If needed, the host can then rearrange by creating a new session.
On the bookings screen:
- Click 'more options' (3 dots) and select the 'cancel booking' option.
- A popup will appear, asking you to confirm your decision. Click 'Yes'.
A notification will be sent to the recipient, informing them that you (the host) have canceled the session.
Recipient cancelling
This will remove yourself (the single recipient) from the booking. If desired, you can send a message before you cancel.
To cancel the booking:
- Click 'more options' (3 dots) and select the 'cancel booking' option.
- You'll be brought to a review screen. You have the ability to send a message to explain why you're cancelling, but this is optional. At the bottom, click 'Yes.'
A notification will be sent to the host, informing them that you (the recipient) have canceled the session. They will then receive a confirmation action to acknowledge your absence. Once they accept, a notification will be sent to you, acknowledging your absence.
2 Extra
Now that we've covered the basics, the next section will delve deeper into management tools and various areas to enhance your bookings experience. We'll explore how all these areas link together and work together with interoperability.
- 2a - History Area.
- 2b - Services.
- 2c - Availability.
2a - History Area
Your History Area is a log of all your activities on Fitain. In this tutorial, I'll briefly explain the relationship between bookings and history. Once a booking is confirmed by the recipient and the scheduled time has passed, it will appear in both the recipient(s) and host's history area.
This makes it easier to track the bookings and see what you and the recipient have done. Unlike plan logs, these entries cannot be deleted.
2b - Services.
Services are designed to be reusable within the booking creation process and will also appear on your profile for connections to book themselves in. Once you set up a service, you can use it as many times as needed. For instance, as a public professional, if you frequently offer a 1-hour remote session for your clients, instead of constantly creating 'custom bookings,' you can create a service to make the booking process even shorter.

To create a service:
- Navigate to 'Your Area' and select the 'Services' tab.
- Click 'Add new service,' and you'll be directed to the 'New Service' create screen.
- Input the mandatory fields, such as 'title' and 'duration.' You can optionally add a picture, description, and location.
- Click 'Save,' and your new service will be created.
To use the service:
- Click 'make a booking,' select the connection(s) you wish to add, and click 'Next.'
- Select your service, where all your information will be pre-filled.
- Choose an appropriate date and time, then click 'Review.'
- Review your details and click 'confirm and create.'
For a remote service
If you plan to make this a remote service, you will not be asked to enter a link. Only when you use the service for a booking, you can then input the link.

To use a remote service:
- Click 'make a booking,' select the connection(s) you wish to add, and click 'Next.'
- Select your remote service, where all your information will be pre-filled.
- Choose the 'remote' field and paste in your link, then click 'Done.'
- Pick an appropriate date and time, then click 'Review.'
- Review your details and click 'confirm and create.'
Please note that if you edit any of the service details during the booking process, it will not overwrite the original.
If you forget to add the link during creation, you can do so afterward. On the bookings screen, click 'more options' (3 dots) and 'Edit details.' Every participant will have access to the remote link.
Services act as a powerful tool to make bookings even faster, and we have plans to extend the functionality of this in due time.
2c - Availability.
This area consists of 2 main functions: adding working hours with additional functionality and adding time off. Once services and working hours have been configured, connections will be able to freely book in with you, making our booking system powerful. This feature is completely optional, but as bookings are crucial for professionals, we wanted to build something special.
First, let's navigate to the 'Availability' area.

To get here:
- Navigate to 'Your Area' and select the 'Availability' tab.
You now have two options to edit work hours and add time off.
Add working hours
Once these are set, they will be visible on your profile for:
- Connections (if you're not in the search)
- Or everyone (if you're in the public search)

To set these up:
- Click 'Edit working hours,' and you'll be directed to the screen.
- Click 'Add availability,' and a popup will appear. You can then select your 'From' time and 'To' time by sliding the lists up and down. Do this for every day.
- Click 'Add,' and you'll have it confirmed on the screen.
Additional options for working hours
These additional options give you more control over how bookings are conducted.
Booking intervals - This allows clients to book with you at specific intervals, such as every half hour, hour, or 15 minutes. For example: if you set it for 1 hour, connections can book with you every hour on the hour.
Maximum daily bookings - You can set a limit on how many people can book with you in a day to manage session requests. For example: only 3 people a day can book with me.
Booking buffer - This acts as a grace period for yourself. For example, you can set a buffer of 30 minutes, which means "people can only book with me 30 minutes after my last booking."
To access these settings:
- Click 'Edit working hours,' and you'll be directed to the screen.
- Click 'Settings' (cog top right), and you'll be taken to the settings screen.
- Change your settings as you see fit.
Adding time off
These are best used if you have a holiday or event that conflicts with your original working schedule. Time off entries will overwrite your working hours on specific times and days.
To add time off:
- Click 'Add time off,' and you'll be directed to the 'Add time off' screen.
- Multi-select the dates you want. If you don't select a time, it automatically means you're not available all day. Optionally, you can add a time slot, which will make you unavailable on the day(s) selected from that specific time.
- Click 'Done,' and you'll be brought back to the main 'Availability' screen.
You can delete these entries by clicking the bin icon on the tile. This means that no one will be able to book in with you at these specific times and dates.
The combination of creating services and adding working hours means connections can book in with you with ease.