Tutorial - Plans | Quick Log View
The Quick Log feature enables you to log your data against exercises quickly and efficiently. It is designed to be particularly useful for intermediate and advanced users who are already familiar with the exercises and prefer a hassle-free option. In this tutorial, we will cover the following topics:
- Quick Log Overview.
- Autofill & Autocomplete.
- Completing the Plan.
1 Quick Log Overview
The Quick Log feature provides a wide range of use cases to maximise its benefits. As previously mentioned, it caters specifically to the intermediate and advanced audience and offers a traditional view. Let's break down the tutorial into the following sections:
- 1a - Accessing the Quick Log View.
- 1b - Navigation.
- 1c - Logging an Entry & Completion.
1a - Access the Quick log View.
After starting a plan, you can choose to access the Wizard View within the Quick Log feature. Now, let's explore the capabilities of the Quick Log in more detail.
To access Quick Log:
- On the Plan Overview screen, click on the 'Begin' button to start the plan.
- On the top left of the Active Plan screen, click on 'Quick Log'. This will take you to the 'Quick Log' screen.
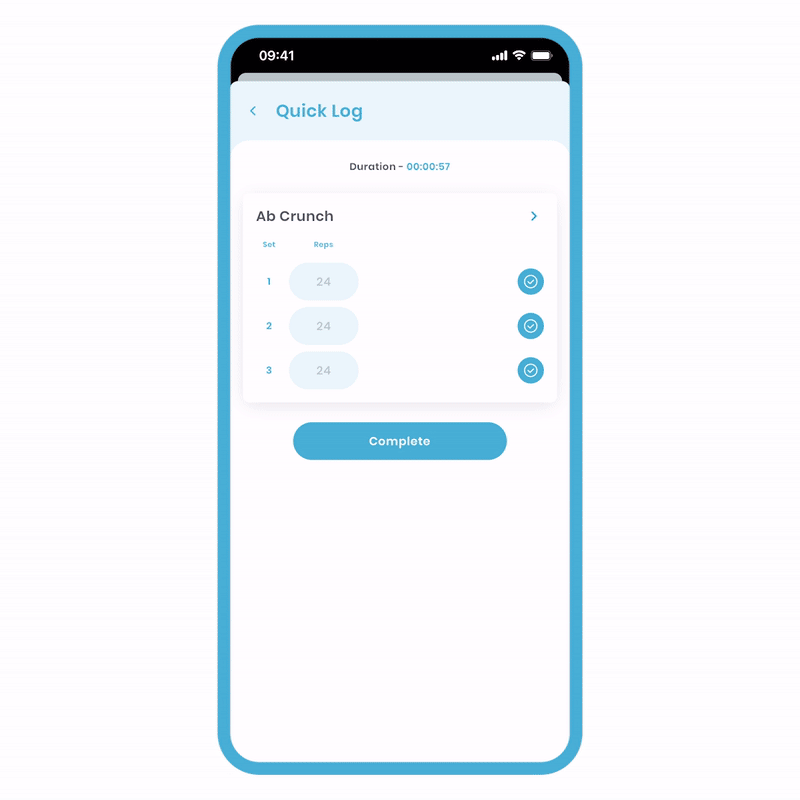
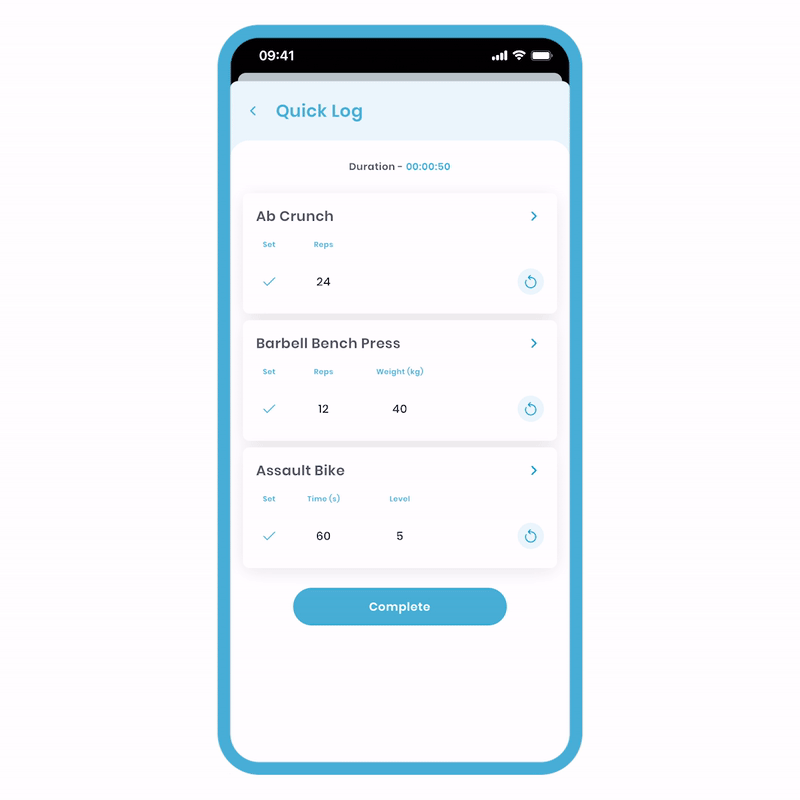
On the Quick Log screen, you will see the duration displayed at the top, which indicates the overall duration of the plan.
1b - Navigation.
You have the choice to either view the exercise along with its description or return to the Active Plan overview to check your current progress.
To view descriptions, follow these steps:
- Click on the right arrow next to the exercise name.
You will then be able to access the video demonstration, setup instructions, instructions, health benefits, and model information. Please note that this is not the Wizard View, so you will not have access to the timer and stopwatch features.

To view your progress on the active plan:
- Click on the left back arrow.
By doing so, you will be able to see your progress represented by ticks within the pictures. You also have the option to 'Finish Plan' and launch the Wizard View if desired.
1c - Logging an Entry & Completion.
The Quick Log operates in a similar manner to the Wizard View. Instead of using the 'completing' feature in the Wizard View, in Quick Log, you will find a tick mark next to each exercise that needs to be clicked upon completion. Additionally, you have the convenience of using the same button to un-complete an exercise if needed.
A practical use case for Quick Log is pre-filling the targets before starting a plan. Simply 'clicking the tick' allows you to lock in your results, making it a highly time-efficient process.
To lock in and log your entries, follow these steps:
- Type in your targets within the designated fields.
- Click on the tick symbol located on the right side of the exercise. As you do so, you will observe that the set number will be replaced by a tick, and the complete tick will be replaced by a 'redo' button.
It is crucial to use the tick on the far right to lock in your logs. If you fail to do so, your entries will not be recorded.
To un-complete an exercise:
- Click the 'undo' button located on the right side of the set.
Upon clicking the 'undo' button, you will observe that the same button will revert to its original state, allowing you to 'lock in' your results once again.
2 Autofill & Autocomplete
If an exercise, set, or group is repeated, you can take advantage of the convenient autofill feature. This functionality is also extended to autocomplete within the Quick Log completion screen. Let's explore the following:
- 2a - Autofill Metrics.
- 2b - Autocomplete Lock-In.
2a - Autofill Metrics.
If an exercise, set or group is repeated, you unlock the convenience of using the autofill feature. Save time by quickly filling out all the repetitions at once. Let's see it in action!
To use the autofill feature:
-
Enter your metrics in the first input field of the first set. Notice the highlighting of the first box in each set, indicating autofill applicability to all highlighted fields.
-
Tap the autofill button on the keypad. All highlighted fields will be filled with the same targets.
Please note that autofill is available only on the first set of the first repetition and can be used in any Update Metrics screen across the app.
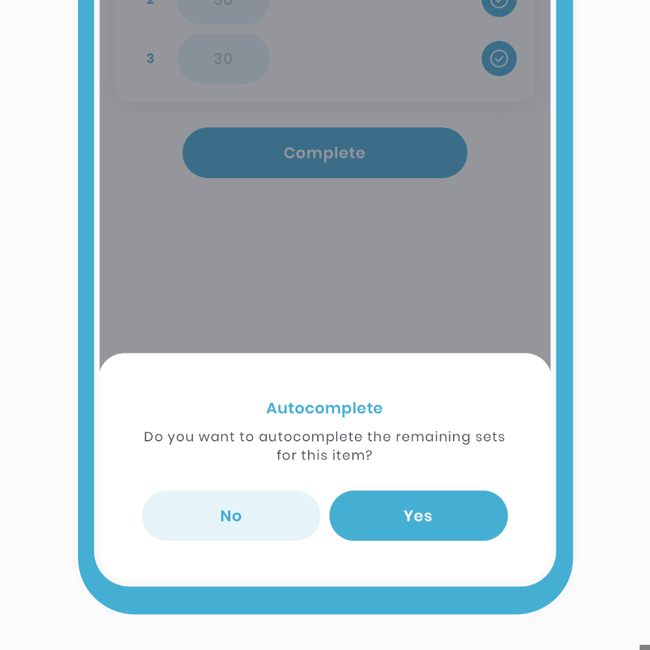
2b - Autocomplete Lock-In.
The same technique can be applied to rapidly 'lock in' all entries, and it is highly recommended to do so.
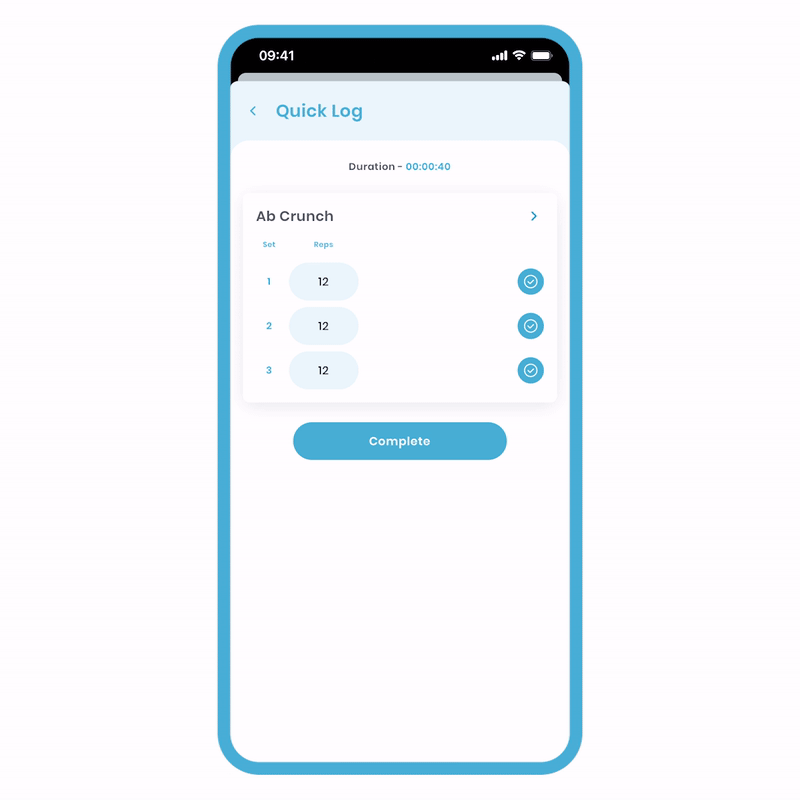
To autocomplete:
- Select the first tick of the first repetition of the exercise.
- A popup will appear, asking if you would like to autocomplete. Click 'Yes'.
- By doing so, all the associated data with the exercise will be instantly 'locked in' all at once.
Please note that the autocomplete functionality is available only on the first set of the first repetition.
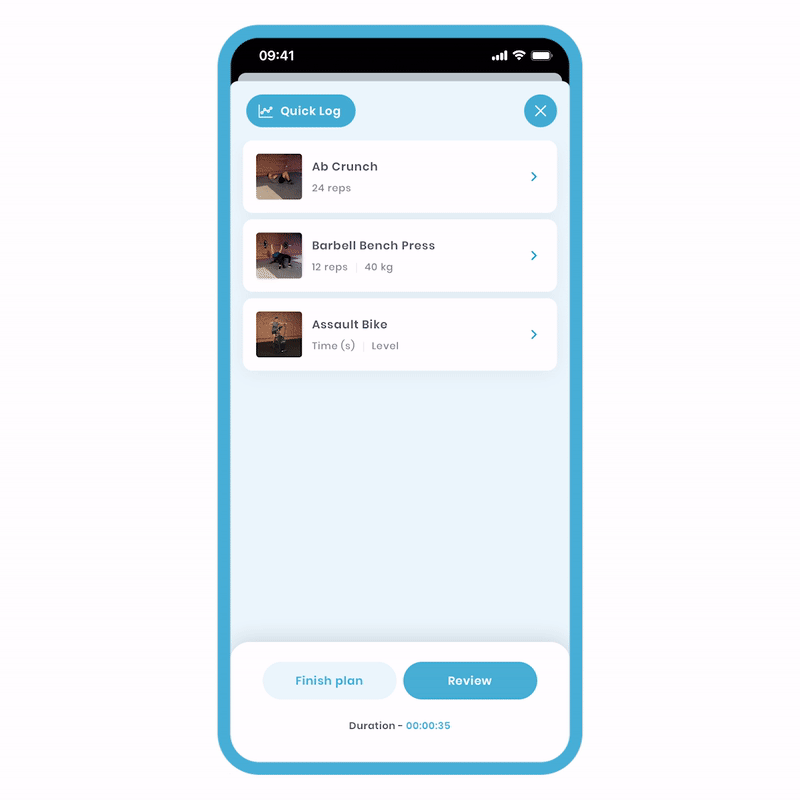
3 Completing the Plan
Similar to the Wizard View, upon completing the plan, you will be instantly taken to the Historic View. In the Historic View, you can access and review all the details of what you have accomplished.

To complete the plan from the Quick Log:
- Fill out your targets for each exercise.
- Press the tick symbol on the right side of each exercise to 'lock in' your entries.
- Once all the ticks are locked in, click on the 'Complete' button located at the bottom of the last exercise.
By following these steps, you will be able to review the detailed results of the plan. Please note that all the targets have been successfully locked in.
Historic View:
After completing a plan, you can view all the loggings associated with it, including metrics and notes.
To look at all historic notes:
1 - Complete the plan. You will then be taken to its historical version for review.
If someone has sent you the plan, they will have access to view all the notes and metrics. This feature is particularly useful for professionals to monitor their clients. Further details about this topic will be covered in another tutorial.